

There’s a subtle shift in the air when September rolls around. I can sense it, without even the slightest glance at a calendar. The light changes. The breeze changes. And the scent around me gets a few notes earthier.
I take this shift as a sign to start planning next year’s garden. (What is it about us gardeners always thinking about the future?). First, I assess what plants I’d like to have more of. But I also think about what plants didn’t do so well this year, why and how I can fix it (preferably without spending anything).
Surprisingly, I found that the answers to these two dilemmas converge in a simple gardening act that, if done now, will pay off in spades next year. (Not literal spades, wouldn’t that be a neat money-saving trick?)
I’m talking, of course, about division.
Division is basically three steps: taking a plant out of the ground, breaking it apart into a few pieces, and then replanting them.
I make more plants for my own garden, but I also have more plants handy to barter and swap with other gardeners. It also serves as a reset button for older, mature plants (such as irises, hostas and daylilies) that haven’t been blooming very well this year.

What plants can we divide in September?
There’s a rule in gardening that we divide spring and summer-blooming plants in the fall and divide fall-blooming plants in spring.
It makes sense to divide the plants that have already finished blooming, of course. They brought us so much joy during spring and summer, so now’s the time to make more of them.
We can divide plants that are already in bloom if we really need to. Plants such as Japanese anemones, sedum Autumn Joy and asters. But we’ll be missing out on their beauty for the rest of the season.

Simply put, the rule makes a lot of sense, but it’s not as rigid as it sounds. We could wait a bit and divide some of the plants on this list the following spring. But let me give you a few reasons why it’s an even better idea not to procrastinate and divide them in September. Then I’ll leave it to you to choose the right timing that works for your garden and your lifestyle.
September is a great month to divide plants. Here’s why:
By September, the weather turns significantly cooler and milder than it was in the summer. And if you’ve already been propagating plants in August, now’s the time to ramp it up.
The temperature in the air might be cooler, but the soil has been soaking up the sun all summer long, and it’s still warm and hospitable.
There is likely to be more rainfall in the fall, so we won’t have to water as often. Watering is a crucial step in establishing newly transplanted perennials.

If we’re dividing for troubleshooting, this is the best time to do it. If the plant is overcrowded, for example, it will affect the number and size of its blooms. And if we wait until spring to divide this plant, we’ll likely have the same problem in the new growing season.
At this point in the year, there is plenty of time for newly disturbed plants to get reestablished before the temperatures dip close to freezing.
Perennials haven’t entered their dormancy period yet, so they’re more likely to recover quickly. But their foliage has started to die down, so we can trim that off and make it easier to work with.
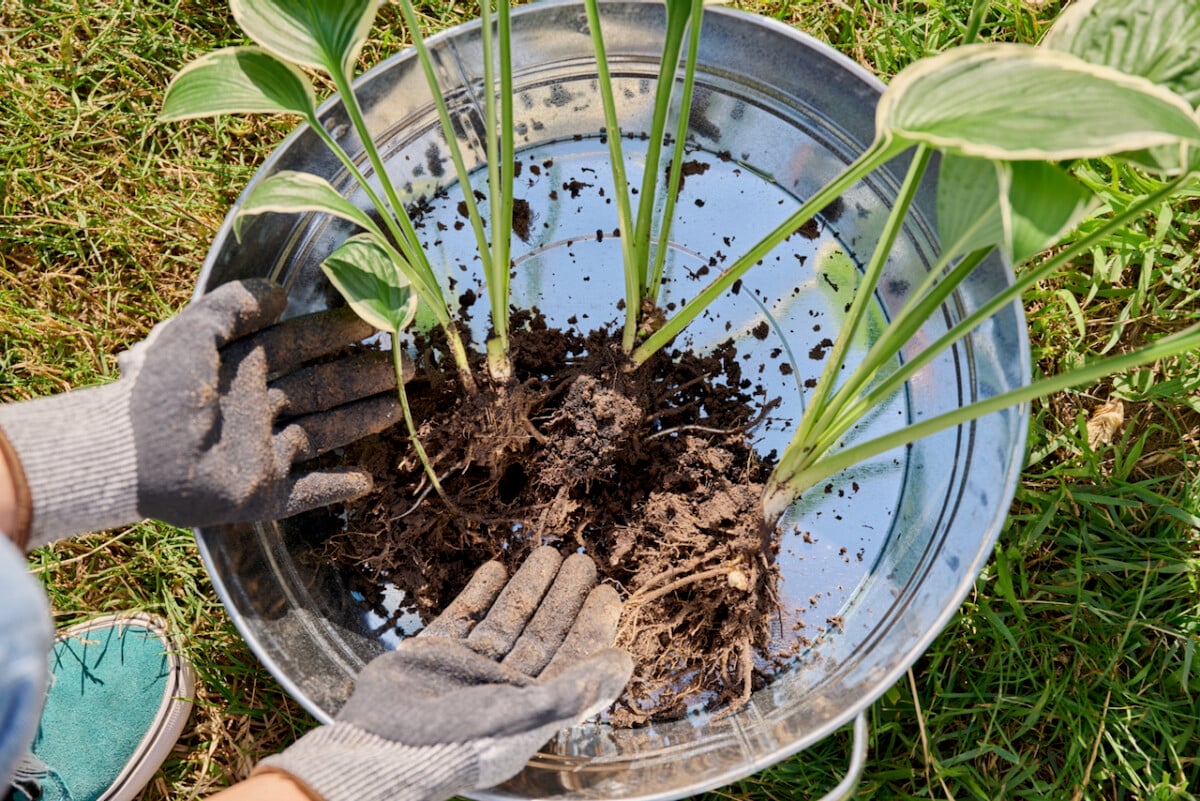
1. Hostas
Hostas are the eternal sweethearts among our Rural Sprout readers. (They share the popularity spotlight with hydrangeas and lavender.) So let’s start with them.
When hostas get overcrowded, you’ll notice that the leaves start growing smaller and smaller. Not good, especially for a plant that we grow for the ornamental value of the foliage. That’s when we know it’s time to divide it.
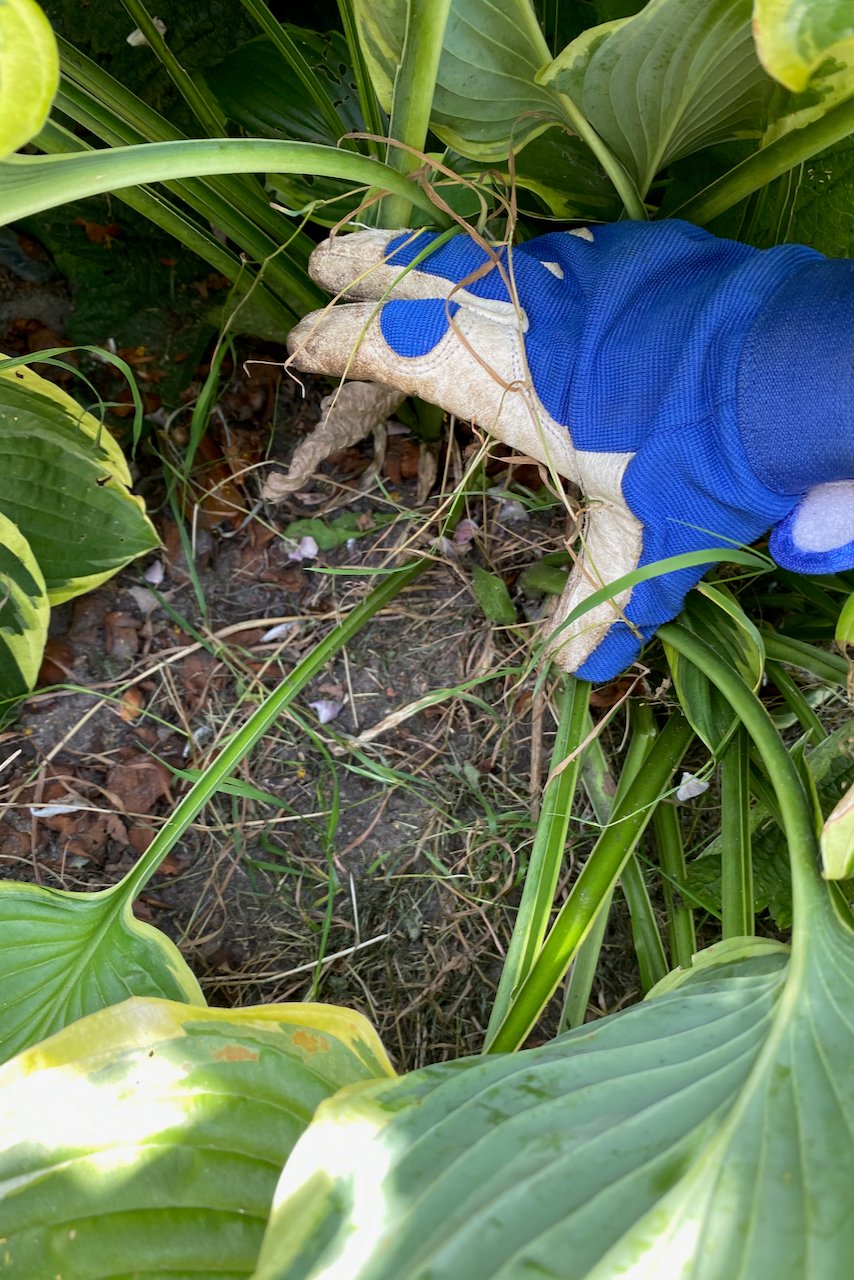
I am convinced that hostas are made of steel. (Though that doesn’t explain the slug damage.) So you don’t have to be delicate when you divide them. Feel the fear and do it anyway, as motivational speakers say. There’s very little you can do to kill a hosta by division.
The nice thing about hostas is that they’ll kind of tell you where there’s a new section. If you inspect them closely, you’ll notice where they naturally split. That’s the section that we can cut with a shovel and pry out of the ground. Just imagine slicing a cake and helping yourself to one slice.

If you want to lift the entire clump in order to get more pieces of “cake”, start by digging around the perimeter. Then, using the shovel as a lever, lift up the root ball and section it into as many plants as you want. You might as well call all your friends now because everyone is getting a hosta today.
2. Daylilies (Hemerocallis)
Daylilies are part of the perennial group that we can successfully troubleshoot just by dividing. If daylilies aren’t blooming as prolifically as they used to, then that’s our clue that they’ve grown too crowded.
In general, we need to divide daylilies every five to seven years anyway. We can also divide them in spring, especially for re-blooming cultivars. But I prefer autumn because it gives them a few extra months to recover.

With mature daylilies that have already grown a large root ball, it may be easier to section them in two while still in the ground using a shovel. And then, using the same shovel as leverage, lift one of the sections out of the ground. Replant it right away before it gets a chance to dry out.
If you can lift the entire root clump out of the ground, that’s even better. We can get so many plants from just one clump, as long as we leave a couple of sets of fans on each plant. A friend of mine started with two plants along their patio; by the fourth year, she had a whole alley lined with daylilies without spending a penny.

The nice thing about daylilies is that they’re very forgiving plants. They will bounce back quickly and will bloom in the first year after division.
3. Perennial geraniums (Geranium spp.)
Perennial geraniums (aka hardy geraniums) are very good communicators. A lot of geranium cultivars will tell us exactly when it’s time to divide them by either splitting in the middle or slowly forming a ring of leaves around a dead center. It takes about four or five years to get to this stage. But once it does, we should take the hint and get to work.
If the foliage of our perennial geraniums has grown out of control and spread far and wide, we can start by cutting back half of it, just to see what we’re doing and where the clump begins and ends.

Using a shovel or a gardening fork, we then dig around the perimeter of the clump, about a couple of inches away from the exterior of the crown. Then, using the shovel as a level, lift the entire root structure.
Have a good look at what you’ve ended up with. How many divisions can we get out of it? (It’s never just two, trust me.) Make your cut through the root clump, or if you’re feeling patient, see if you can untangle the roots with your hands. Each root section that we put back into the ground has to have some top growth to sustain itself.
We must remember to water the geranium divisions thoroughly if we’re not getting much rain this September.
4. Peony (Paeonia hybrids)
Peonies are long-lived perennials, and they can live long and happy years (even decades) if you leave them undisturbed. I would highly recommend that you do.
But if you do want additional peonies (and I don’t blame you, as they can cost a pretty penny nowadays), you can divide these herbaceous perennials. It’s not easy, due to their bulky stature, but it’s worth it.

We have to dig out the entire clump and sever a few of the newer sections that have naturally grown apart from the center. They’ll basically look like thick sticks. This article on planting peonies will prepare you for what to expect.
When we replant the divisions, it’s really important that we place them at exactly the same depth as they were before.

I should warn you that it might take a few years before newer peony plants start blooming again. Remember to keep them well watered in the meantime, and don’t make a habit of dividing peonies too often.
5. Irises
This is one of those cases where division doesn’t just get us extra plants, but it also solves a common problem: lack of blooms. Ideally, we should divide irises right after they’re done blooming. But for me, that’s often in early July when I have holidays and travel on my mind. But I do make it a point to get this job done in the fall.

You’ll notice that they may have formed a donut-shaped bald spot in the center of the clump. That’s called a “dead center,” and it is a sure sign that they’ve grown overcrowded. You have probably noticed (or you’ll notice soon enough) that they haven’t been blooming as well. Division will rejuvenate the plant and fix this problem.
We can start by cutting off the top half of the foliage to see what we’re doing. We don’t have to do this, but it makes it easier. A sharp pair of scissors makes all the difference here.
Next, start loosening the roots by digging around the perimeter of the plant, ensuring you don’t dig too close to the rhizomes. Lift everything up.

If there is an unproductive donut in the middle, you may even find that the divisions are starting to break away from it in a natural pattern—a perfect pattern to choose where we make our divisions, too. Pull apart the clumps as they come. You might end up with a loose, dead center, which you can discard.
When we replant the divisions, we must replant them at the same level they were growing at before we divided.
For a more thorough tutorial on dividing irises (including step-by-step photos), you can have a look at this article I wrote a couple of years ago.
6. Lady’s mantle (Alchemilla mollis)
I enjoy growing lady’s mantle in my garden because it’s such an unfussy plant. It’s tolerant to drought (and some neglect), bounces back quickly and doesn’t spread out of control.
Sure, the flowers aren’t much to write home about, but the leaves have such an interesting shape and texture. The way they capture raindrops is truly a work of beauty.

Lady’s mantle is not one to naturally flop open, like some of the other perennials in this article. So I have to dig out the entire root structure. I then cut through the roots using my secateurs or hori hori knife. And just like that, I’ve made more plants.

And even if you gave it the Chelsea chop like I advised you earlier in the summer, then the foliage should have already bounced back by September. Rest assured, you can still divide it without fear.
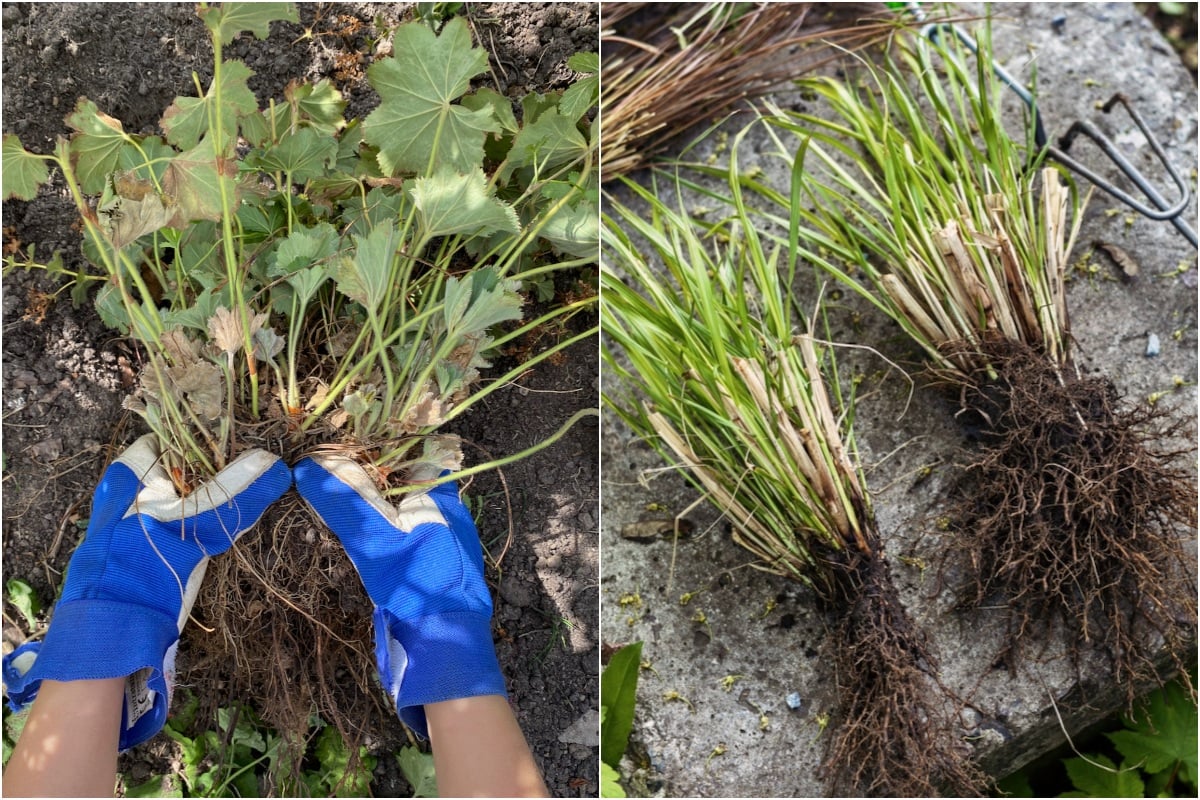
7. Ornamental evergreen grasses
We can divide both deciduous and evergreen grasses in the fall. But I’d advise you to leave the deciduous ones to overwinter in the garden and deal with them in spring.

Evergreen grasses, however, are ripe for division now. The growth pattern of grasses means that they won’t travel far, but they’ll bulk up in circumference. So if we want to have them in separate clumps, we have to do the job ourselves.

Dig out the entire clump, cut the roots into however many divisions you want, and replant it at the same depth. The abundance of foliage in evergreen grasses makes them very prone to desiccation, so it’s important to keep watering all the divisions until they get established.
8. Coral bells (Heuchera)
Coral bells bloom all summer long. They have such a long blooming period, in fact, that I’d consider them the exception to the rule I mentioned at the top of the article. I do divide them when they’re in bloom because otherwise there would be a very small window left when they’re resting.

You’ve probably noticed that heuchera tend to heave up during the cold months. This means the plant pushes out of the ground a little bit, and we often notice some root exposure. A lot of plants do that, and it’s perfectly normal and easily fixable. But we can preempt that by dividing coral bells in the fall.

You know by now what to do. Dig up the root ball and see how many pieces you can split it into. By fall, the heuchera leaves along the main stem will have probably dried up, so you can remove them. Also, remove any dry pieces of root (which also happens a lot in coral bells). Try to get as much root as possible with each division, but don’t worry too much if you can’t. Some heuchera will resprout from the stem, not the root.
9. Canna lilies
Canna lilies hit their blooming stride in June and July, with a few late-comers lingering around in August. But by September, there’s not much left but foliage. And even that is getting a bit ragged-looking.

You could wait until spring to divide canna rhizomes. In my climate, cannas grow as tender perennials. Once the first frost hits, the lush tropical leaves turn into brown sludge. (It really looked like mud last February, when I hadn’t had a chance to clean them up.)
So I prefer to divide them in the fall. It’s super easy to divide cannas because their rhizomes will tell you exactly where to cut.

You can divide the rhizomes separately, with one rhizome per planting, or keep them grouped. Even after division, I like to keep them looking rich and lush. So I plant them in groups of three, not in the same planting hole, but quite close together.
And if you’re reading this and you don’t have cannas in your garden, what are you waiting for? Here’s how to get them started.
10. Ornamental alliums
Ornamental alliums are so shallow-rooted that you could basically ask them nicely to come out of the ground all on their own. But just in case your alliums don’t take instructions too well, give them a helping hand by digging around the base of the plant and levering them out with a spade.

I hope you’re wearing gardening gloves because otherwise you’ll end up smelling like an onion for a week.
From this point on, you can pull smaller clumps apart from the root ball. It’s quite satisfying, actually. Replant the new divisions as soon as possible and always at the same depth as they were planted before.

Get the famous Rural Sprout newsletter delivered to your inbox.
Join the 50,000+ gardeners who get timely gardening tutorials, tips and tasks delivered direct to their inbox.