

After you’ve successfully fermented batch after batch of amazingly crunchy sauerkraut, perfecting the process along the way, brine and spices included, the question begs to be asked: what fermented veggies are you going to experiment with next?
Lacto-fermented garlic is a super-easy recipe to try. It knows no bounds when it comes to boosting your health!
Another lacto-fermented foolproof recipe is that of wild fermented salsa without whey.
When you are drowning in tomatoes fresh from the garden, it is a wonderful way to extend the harvest. Plus, it is beyond scrumptious! Way more flavorful than anything you can buy pre-packaged from the store – without any of the packaging.
If you are looking for ways to reduce food and packaging waste, in an effort to go zero-waste, growing your own vegetables is a fine way to start.
Buying loose vegetables and fermenting in jars, or dedicated fermentation crocks, that you already own, is another way to practice self-reliance.
How about fermenting carrots?
Carrots are wonderful when tossed into soups and stews, they also make for a crunchy light snack too. But what if they could be even more nutritious and delectably delicious? Yes, please! But how…
Lacto-fermentation is the answer you are seeking.
Because, ultimately what you are after is the gut-friendly probiotics that want to help you boost your health and your resistance to germs and other harmful bacteria that are flying around.
It’s simple and complicated at the same time. You must consider timing, temperature, the proper brine solution, with perhaps a pinch of good fortune.
Have you ever sampled a beautifully fermented carrot?
They are incredibly tasty when everything works out right, but it turns out that they are not the easiest vegetables to ferment. Not so easy as cabbage, onions and garlic. Yet, in the end they are worth the trial and effort.
We’ll share some troubleshooting tips at the end of this article, just in case you run into moldy, yeasty difficulties.
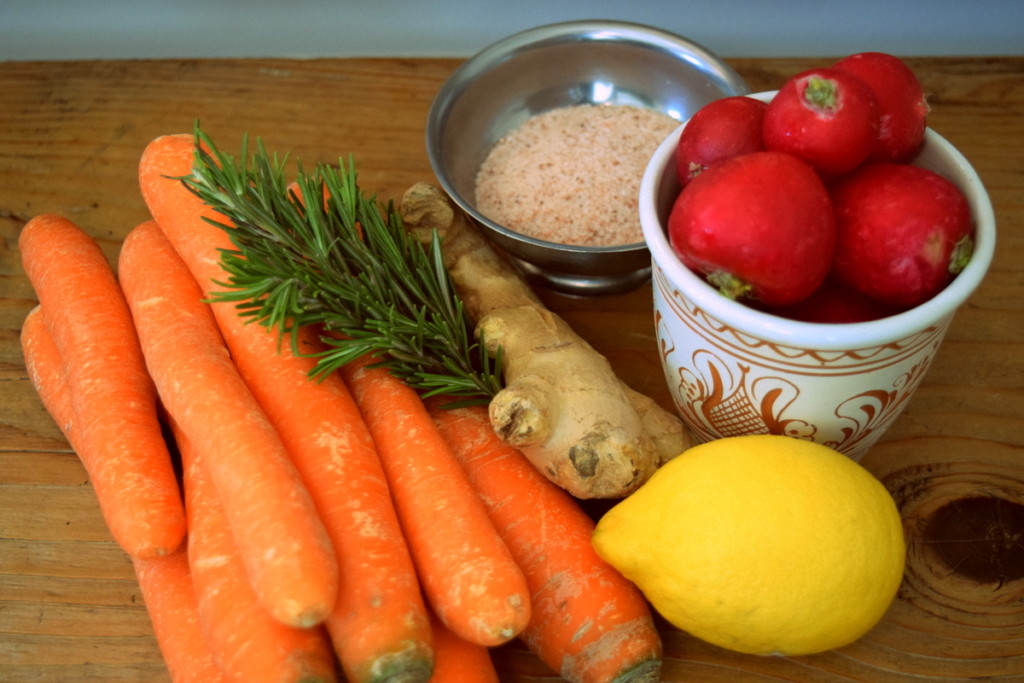
Ingredients needed for fermenting carrots
The more vegetables you can grow in your backyard, the better!
If you haven’t had much success in growing carrots, do the next best thing and buy some organic ones for this special fermented treat.
Kids of all ages will enjoy it, so make a pound or two for starters – then work your way up to bigger batches.
To determine what flavors you like the best, make all 3 fermented carrot recipes at once (or simply choose your favorite one) using these ingredients:
- 2 pounds organic carrots – orange, purple or white
- 1-2 bunches of radishes
- 1 organic lemon (you will be using both juice and the rind)
- 2″ piece of ginger
- Fresh rosemary
- Himalayan salt, for the brine
- Garlic cloves, optional
Fermented foods are best consumed raw.
Serve the sliced radishes and carrots as a side salad, and dip the carrot sticks in your favorite nut butter. If you do choose to cook with ferments, be sure to add them very last minute, or just as you take your pot off the stove.
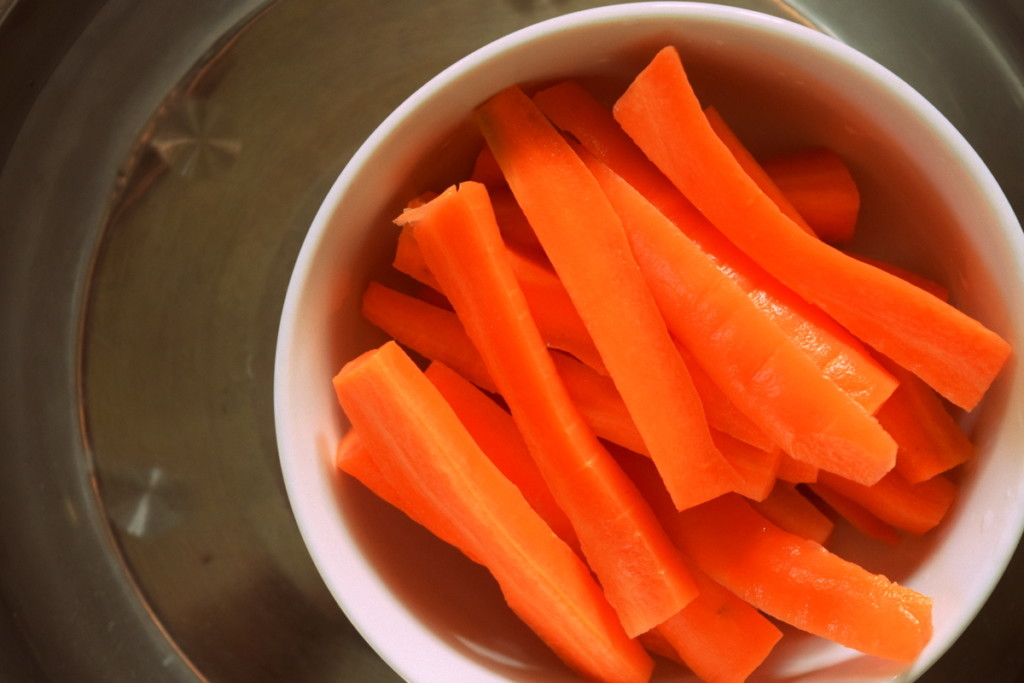
Lacto-fermented carrot sticks
Once you’ve created your first few ferments, the process will become second nature and it will be easy to repeat with variations of the same ingredients.
We’ll describe the carrot sticks in more detail and leave the radish/carrot mix and ginger-carrot slaw to your creative kitchen skills and imagination.
Prep time: 25-30 minutes
Fermentation time: 4-5 days
Step 1 – Make the brine
Salt is one of the most important ingredients in fermentation. It keeps undesirable bacteria at bay, just as it keeps your veggies nice and crisp. Use too little and they may become soggy, too much, and your ferment will be far too salty to be enjoyable.
So, what’s the right ratio. It depends.
How large or small are the vegetables cut? What kind of salt are you using? Even the saltiness of the brine can be a personal preference.
When reading fermentation recipes you will see varying ratios of salt:water. To make a salty brine, take a separate jar than what you will stuff your ferments into, and begin to experiment. A very loose measurement is 1-3 tablespoons of salt per quart of water.
For these fermented carrots you may want to start with:
- 3 cups water, filtered or boiled
- 2.5 teaspoons salt
Fermented carrots take about 5 days, so you’ll be able to taste the results of your brine soon enough!
How Much Salt to Use When Fermenting Vegetables @ Cultures for Health
Step 2 – Gather and prepare your ingredients
Wash your carrots and trim the ends. If the carrots are relatively clean, there is no need to peel them.

Measure one carrot against the side of your jar, and cut them all to similar lengths, as thickly or thinly as you wish for snacking.
Step 3 – Pack the carrots
Stand the carrots straight up in the jar, leaving plenty of headspace for the brine to come, stuffing in a fresh rosemary sprig or two on the sides. Make sure they are packed nice and tight to ensure they stay submerged beneath the brine.
Step 4 – Add the brine
Pour the brine over the carrot sticks, making sure that they are all covered.
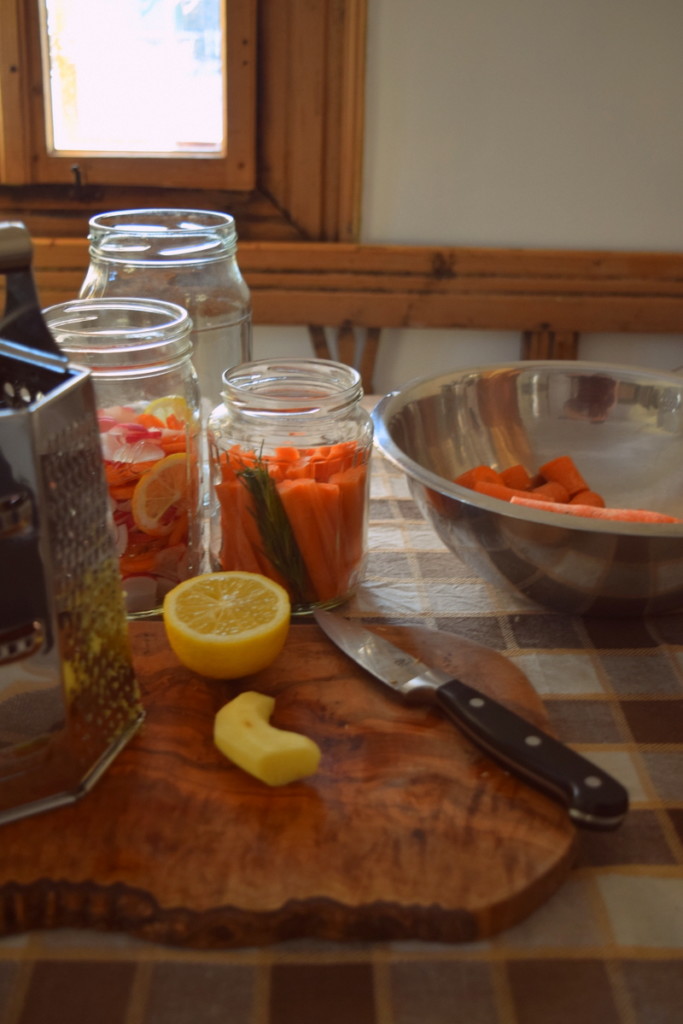
If your jar accommodates fermentation weights, now is the time to use them. Carrots must be fully submerged under the brine, or mold will inevitably form.
Step 5 – Cover the jars
Loosely cover the jars of carrot sticks with lids. If you choose to tighten them just a little, make sure to release the carbon dioxide that naturally builds up a few times a day.
Be sure to place your jars in a baking dish, or on plates to catch any eventual overflow that occurs during active fermentation.
Step 6 – Wait
While your carrots are actively fermenting, there is nothing for you to do but relax and wait – this could take up to 5 days.
Be sure to check on your jars from time to time to monitor for mold and “doneness“. Check to see if they are ready to eat by sampling one carrot stick after some time has passed beyond the active fermentation period.
Step 7 – Slow the fermentation
The slower you can ferment your carrots, the better the flavor will be. After a few days in the warm kitchen, transfer them to a cooler room (or the door of the fridge) until they are ready to eat.
Lacto-fermented carrots can be stored at room temperature for a couple of weeks and for about 6 months in the fridge.
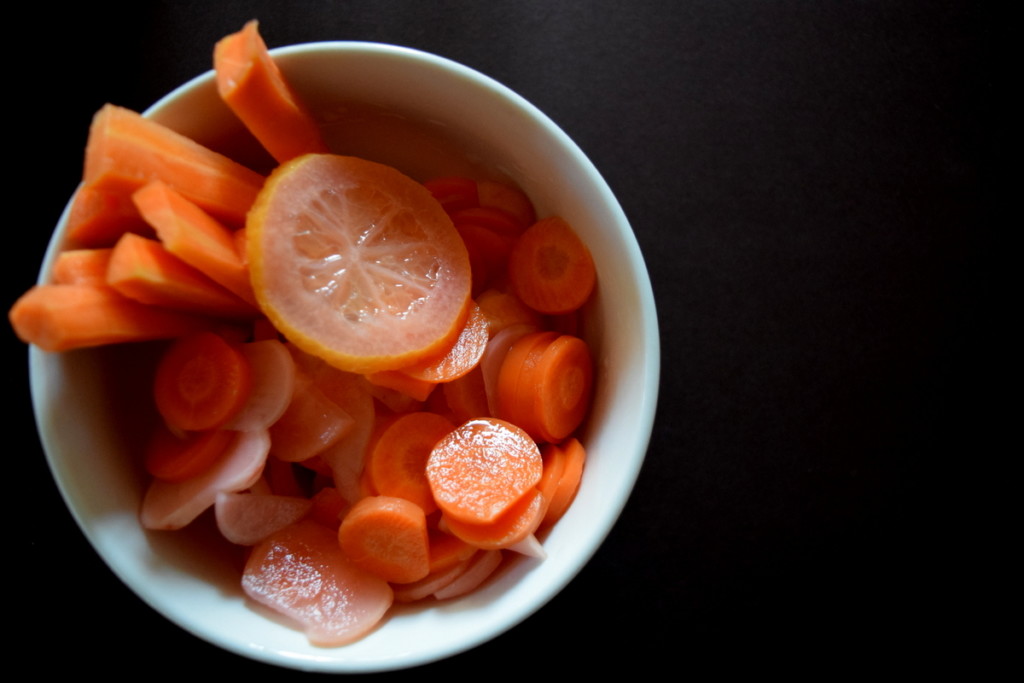
Fermented carrots and radishes
To make this lovely ferment, in addition to carrots, you can add any kind of radishes that you have.
The color doesn’t matter quite so much, as it will fade as the ferment ages, but do be sure to cut both the carrots and the radishes in similar size pieces.
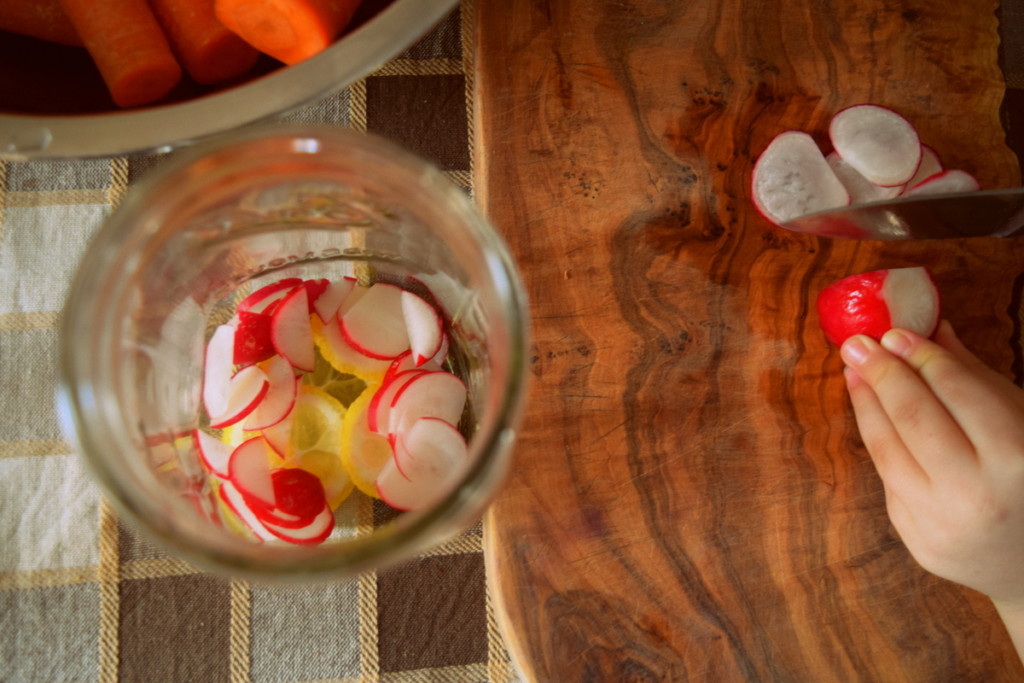
And, by all means, add a few slices of lemon too! It is a refreshing way to bring all three ingredients together into a probiotic-rich side salad. You can also top your burgers with it too.
Proportions-wise, aim for a 50:50 mix of carrots to radishes. Make brine as above and be sure that the vegetables are covered with a weight, or by using a fermentation airlock on your mason jars.
Ginger and carrot slaw
For every 4 cups of grated carrots you have, add 1 T. freshly grated ginger. Mix them by hand, grating in some lemon rind for even more zest.
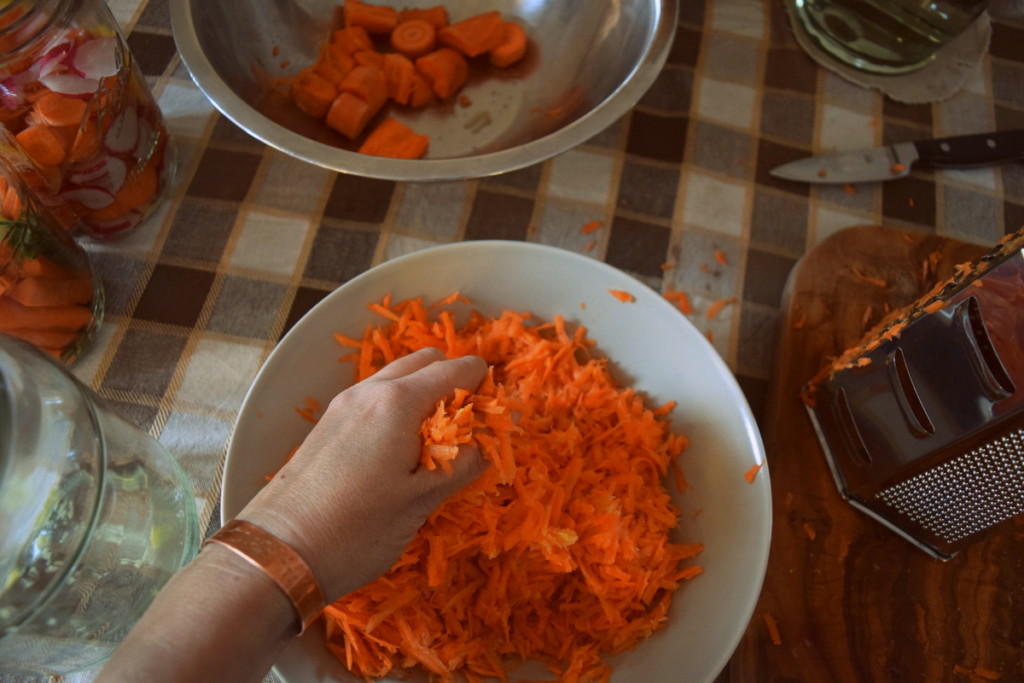
Press this mixture down firmly into your jar, removing as many air pockets as possible, then pour on the brine till it just covers the carrots. It is difficult to keep the shredded carrots from floating. To combat this, you can use a cabbage leaf and a fermentation weight to keep them from rising, along with a lid or airlock.
You will also want to take care to cover your ferment with a kitchen towel if it receives too much sunlight.
In 3-4 days you will be rewarded with a zingy carrot slaw that can be eaten on its own, added to a larger cabbage coleslaw, or served on top of a pulled pork sandwich. The possibilities for pairing it with lunches and dinners are endless.
Take this carrot-ginger slaw one step further, next time turning it into a spicy carrot kimchi.
More variations to try
As is the case with cooking, so is it with ferments. Take a recipe and make it your own by adding the herbs and spices you like best!
Add a teaspoon of turmeric, spice your carrots up with some dried hot peppers, slip in some fresh or dried dill, add peppercorns, sage, whatever you think may taste good.
If you are wrong, try and try again. No one becomes a master of fermentation by filling just one jar.
Troubleshooting carrot fermentation
When making ferments, things can, and do, occasionally go wrong.
The air temperature can be too high or too low, the amount of light may be too strong, there may be too much oxygen or bacteria, or the carrots a little past their prime. Which bring us to the first order of success – always use the best possible produce in your ferments.
Choose carrots that are firm and free of blemishes for the best possible ferment.
We’ve already mentioned experimenting with the amount of salt in the brine, which leads us to the next concern: water.
Water
It is essential to never use water directly from the tap for your ferments as the chlorine can interfere with the fermentation process. Similarly, if you have well water, bacteria may be present that can also do more harm than good.
Filtered or distilled water is the best choice for fermenting.
Boiled, and chilled, water also works wonderfully. Choose whatever way is within your means.
Yeast
Carrot ferments are subject to growing yeast because of their high sugar content. The most common one being a cloudy white cover, which can be found floating on top of your ferment, then gradually sinking down between the veggies.
It is called Kahm yeast, and while it isn’t harmful, it isn’t so desirable, or flavorful, either. Yeast is a signal that perhaps not enough salt was used in the brine – so, go back and try again, keeping notes as you go along.
Yeast can also occur if the room temperature is too warm. Ideal fermentation temperatures range from 65-70°F (18-21°C).
If you catch it in the early stages, simply remove the yeast with a spoon and eat your ferment quickly.
Next time, be sure that your vegetables are completely submerged and sealed, or introduce more acidity to the ferment by adding some less sweet vegetables.
Mold
Here is where you draw the line. If you have mold, the ferment is destined for the compost pile.
Mold happens when the vegetables are not fully submerged under the brine. It can even grow on that cabbage leaf or slice of squash helping to weigh the shredded carrots down. It also grows when the conditions are just right – warmth, air flow and not enough salt.
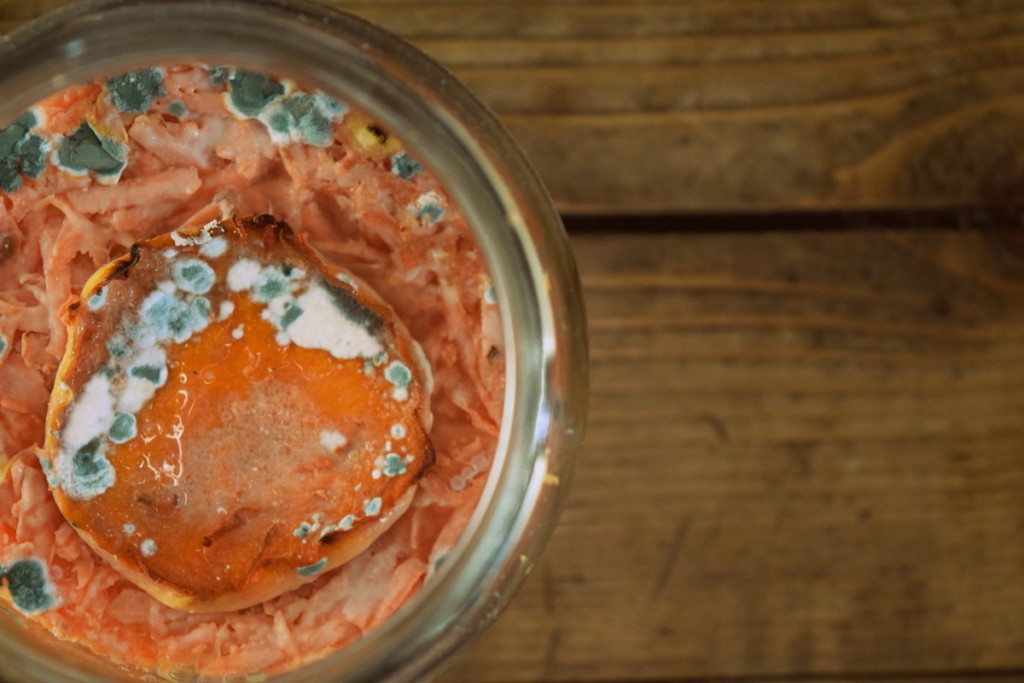
If you end up with mold on your ferments, examine what could have gone wrong, and try to correct for it in the future. Then invest in a quality fermentation crock or airlocks for your jars. Excellent quality will save you time, money and frustration in the future.
When you encounter a small disaster, just keep going. Fermenting is an enjoyable and very healthy way to eat your probiotic-rich veggies!
Broaden your fermentation knowledge
If you are excited to try fermenting even more vegetables, this book is a must-read:
Fermented Vegetables: Creative Recipes for Fermenting 64 Vegetables & Herbs in Krauts, Kimchis, Brined Pickles, Chutneys, Relishes & Pastes by Kirsten and Christopher Shockey
Master the art of fermentation and sooner or later you will discover the joys of making honey mead and homemade wine. Dream of the pantry you desire and start learning the skills that will help you fill it!

Get the famous Rural Sprout newsletter delivered to your inbox.
Join the 50,000+ gardeners who get timely gardening tutorials, tips and tasks delivered direct to their inbox.