

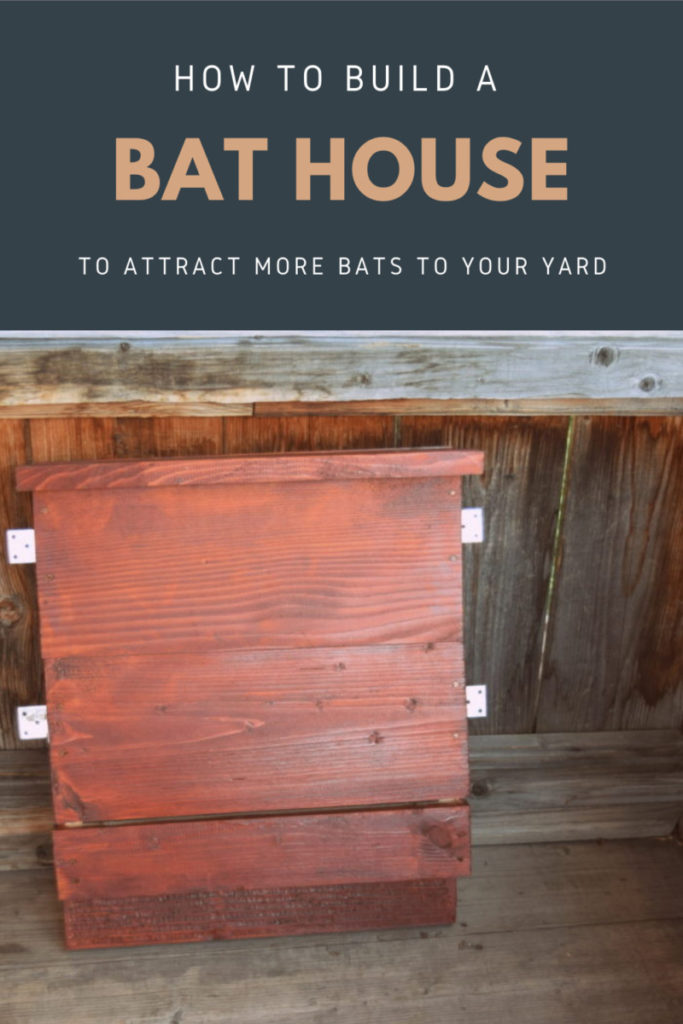
Just as there are several ways to attract bats to your yard, there is more than one way to build a bat house.
But before you blindly choose a bat house plan, you should become aware of why, how and where your intended bat house fits into your landscape.
Think of adding a bat house to your garden, or the side of your home, as a simple and necessary act of rewilding.
Rewilding your neighborhood, rewilding your city or state, rewilding yourself and nature in general.
After all, we have plenty of land and resources to share – and so much to gain when we work with nature, instead of against it.
Why attract bats?
Are you the kind of person who heads out for a walk at dusk, in joyous anticipation of seeing these magnificent flying creatures?
Or are you covering your head as you sit outside by the campfire the moment something mysteriously flies by?
It is true, some people are afraid of bats, just as there are those who are afraid of dogs, or spiders, or snakes. Add to this list anything that frightens you, but refrain from being put off by the many benefits that bats can provide to your garden.
At least be curious enough to gather information first.
Bats provide an excellent service: natural pest control
It is known that the average bat can consume around 600 bugs per hour, between 3,000 and 4,200 insects each night. A single colony of 500 bats will catch and eat a million insects each night.
Their diet includes mosquitoes, termites, wasps, beetles, gnats, moths and lacewings.
You can read much more on the benefits of bats here: 4 Ways To Attract Bats To Your Yard (And Why You Should)
If you are struggling with finding an organic balance that doesn’t involve spraying chemicals on your garden to eliminate certain insects, you may want to attract bats to do some of the job for you.
Remember, rewilding is where the world is heading to help heal collective damage done to the environment. Your job is to make it happen.
How to build a bat house
Now, that you are sure you have a fond affection for these amazing flyers, to build a bat house should be added to your ever growing to-do list.
One quick search across the web and you will find all sizes of bat houses. Which one is right for you? And for the bats?
Let’s just say that it depends on where you intend to place your bat house. On a free-standing post, or mounted on the side of your home?
If you are placing a bat house on a tree, you might want to choose a narrower design that does not stick out too far from the trunk.
Use caution, however, when placing a bat house on a tree, as bats will also exercise their caution. In a tree, bats are easier caught by predators, the branches create shade (which makes their home colder) and obstruct the entrance/exit, making life more difficult for the bats.
Placed on the outside wall of your home, a bat house can be any size, within reason. Though bats do have their preferences. Some bat houses are 2′ x 3′, while some have had success with smaller homes of 14″ by 24″.
One measurement that is perhaps more important than either size or shape is the space that the bats will roost in. This space is generally 1/2″ to 3/4″.
If you would like to attract bats to your garden, yet lack the skills or the tools to build a bat box yourself, you can always buy a variety of bat boxes online. This Kenley Bat house with a double chamber is weather-resistant and ready to install.
When will the bats come?
Maybe it is too early to answer the question, yet everyone always wants to know the answer…
There is never any guarantee that bats will take up temporary residence in your bat house, but when they do, you will be ready.
Providing bats with a place to roost, combined with garden features (water, bugs and plants), along with a good location, is key to attracting them. And in encouraging them to return year after year.
Overall, it may take 2-3 years until bats take up residence, so don’t get discouraged too quickly.
To encourage good bat house design and placement, it is wise to find out why some bat houses fail. In this way, you can learn from the mistakes of others.
Choosing a location for your bat house
I know it is exciting to get started! Though before you go ahead with your own bat house building plans it is also good to know where that bat house of yours should be placed.
The best location for a bat house is:
- sunny, with about 6 hours of sunlight each day
- south to southeast facing
- near a source of water (within 1/4 mile)
- sheltered by winds, if possible
- high up, 8-20 feet above the ground
If you have a combination of those conditions, you are free to start collecting materials to build a bat house.
Choosing wood to build a bat house
Bats are sensitive creatures.
As such, you should refrain from using treated wood (which is toxic to bats) when building a bat house.
Instead, opt for naturally weather-resistant woods such as cedar, white oak or reclaimed barn wood. These will last longer than soft pine, though you can still use this softer wood if your bat house will be sheltered or below an awning.
Plywood can also be used, although it may be better for other homestead projects. Never use pressure-treated wood.
Since you will need to make grooves in the wood, for the bats to hang from, be sure the back of the bat house is constructed from solid piece(s).
Gathering materials to build a bat house
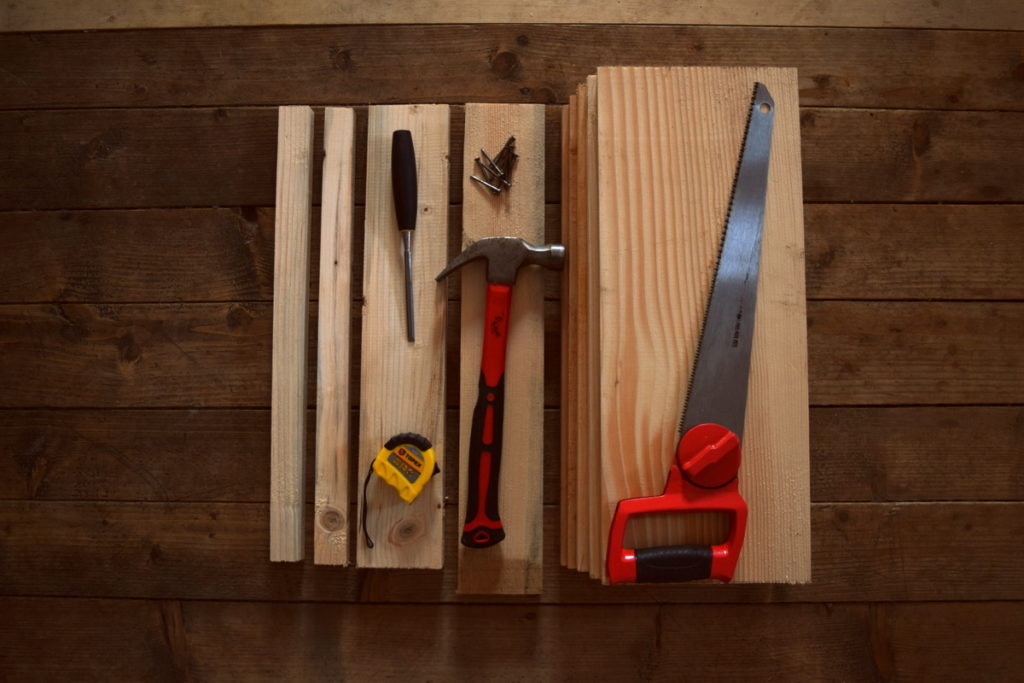
As far as materials go, you will need to gather:
- pre-cut wood
- measuring tape
- nails, or screws, exterior grade
- 4 L-shaped brackets
- drill
- table saw or hand saw
- chisel or utility knife
- clamps
- natural dark wood stain or sealant
- paintbrush
For a more comprehensive guide on building a bat house, check out the National Heritage Conservation – Wisconsin Bat Program PDF.
Cutting out the pieces
In an ideal world, you could build a bat house out of 6 pieces of wood.
But, life doesn’t always hand you the size of wood you like. When was the last time you came across an almost 20″ width of solid board? Nowadays that would come from a very mature tree. And I am sure that bats would appreciate that old tree over a cut down and reassembled version any day.
So, what we are looking at when building a bat house is using boards.
We will share the dimensions we used to make ours, just know that yours may turn out slightly different. Especially if you are using reclaimed wood. This is all well and good, provided that everything lines up.
Think of it as cooking without a recipe, yet having all the ingredients. It will always work out in the end.
You may even wish to read more about criteria for successful bat houses before deciding on measurements of your own.
Wood sizes for our DIY bat house
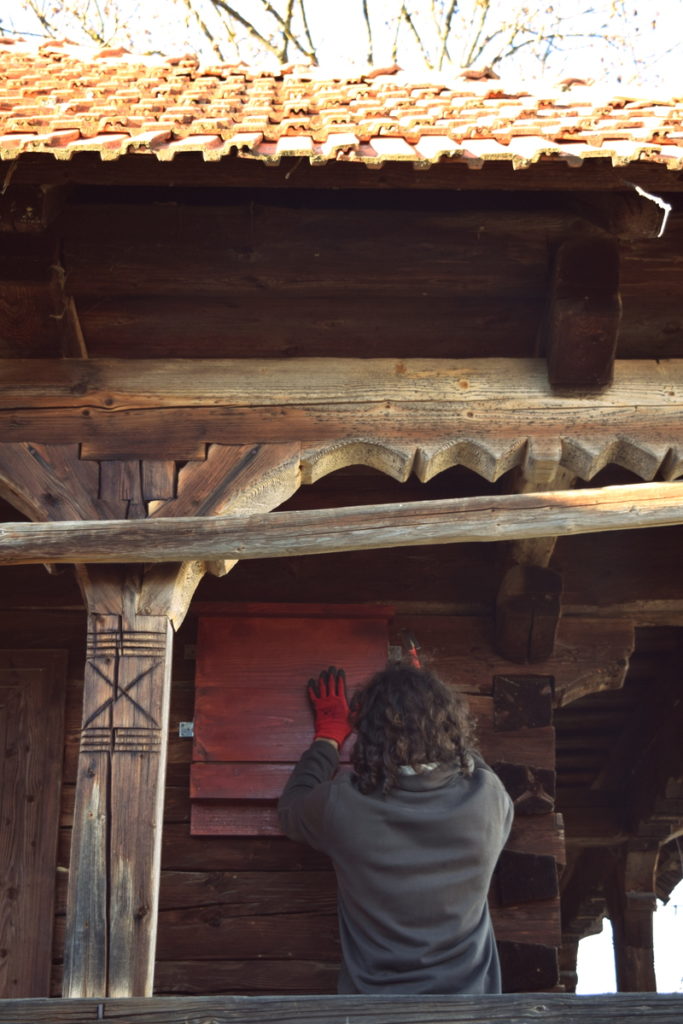
Using both untreated beech and fir boards to create our bat house, we came up with these “reclaimed” sizes:
- 5 pieces of 1″ x 8″ x 19 1/2″ (2.5 x 20 x 50 cm) for front and back of house
- 2 pieces of 1″ x 1 1/4″ x 19 1/2″ (2.5 x 3 x 50 cm) for provide roosting space
- 1 piece of 1″ x 3 1/2″ x 19 1/2 ” (2.5 x 9 x 50 cm) for the front, which provides a small air gap
- 1 piece of 1″ x 3 1/2″ x 21″ (2.5 x 9 x 53 cm) to cap the top of the bat house
Overall dimensions of finished bat house:
width: 19 1/2″ (50 cm)
height: 23 1/2″ (60 cm)
depth of box: 3 1/4″ (8.5 cm) with the cap’s additional overhang of more than an inch
roosting space: 1″ (2.5 cm)
If you are building a bat house with more than one chamber, bats will prefer roosting spaces of 3/4″ to 1″.
You also need to provide the bats with a roughly grooved landing pad.
Putting your bat house together
Start with the basics and create the essential part of the bat house first – the landing pad and roosting chamber.
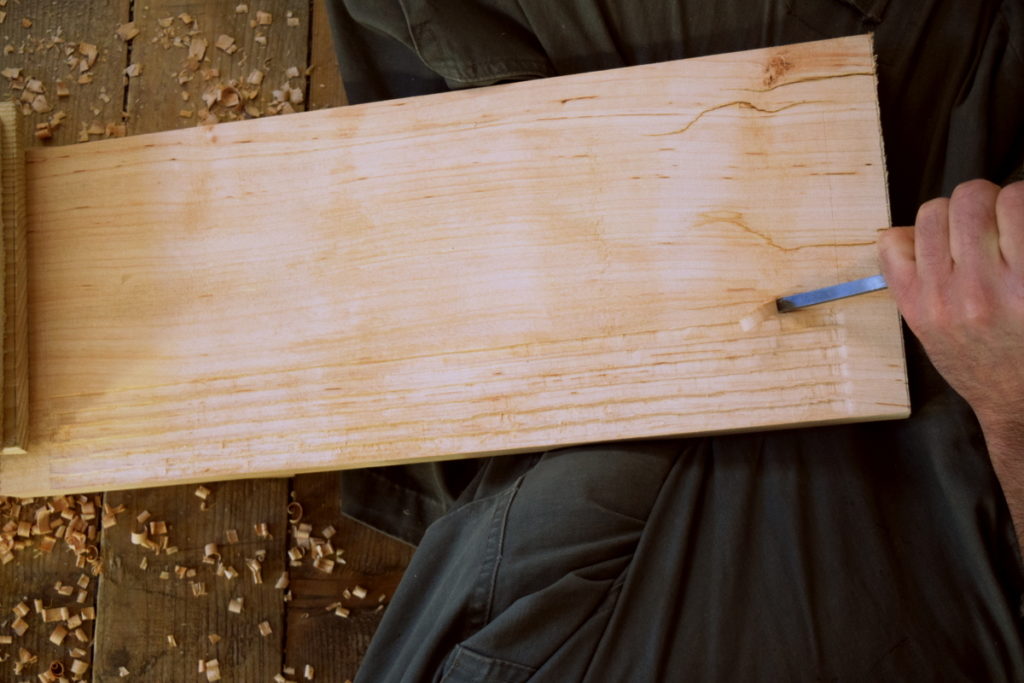
Avoid using plastic mesh or wire inside the bat house that can hurt the bats as they get stuck.
Instead, provide something easy to grab onto. It takes some time to use a chisel to create grooves for the bats to climb and cling on, though it looks nice, rough and natural all at the same time.
Outside of using a chisel to carve, you could also employ a circular saw to do the job in a quicker, albeit more orderly, fashion.
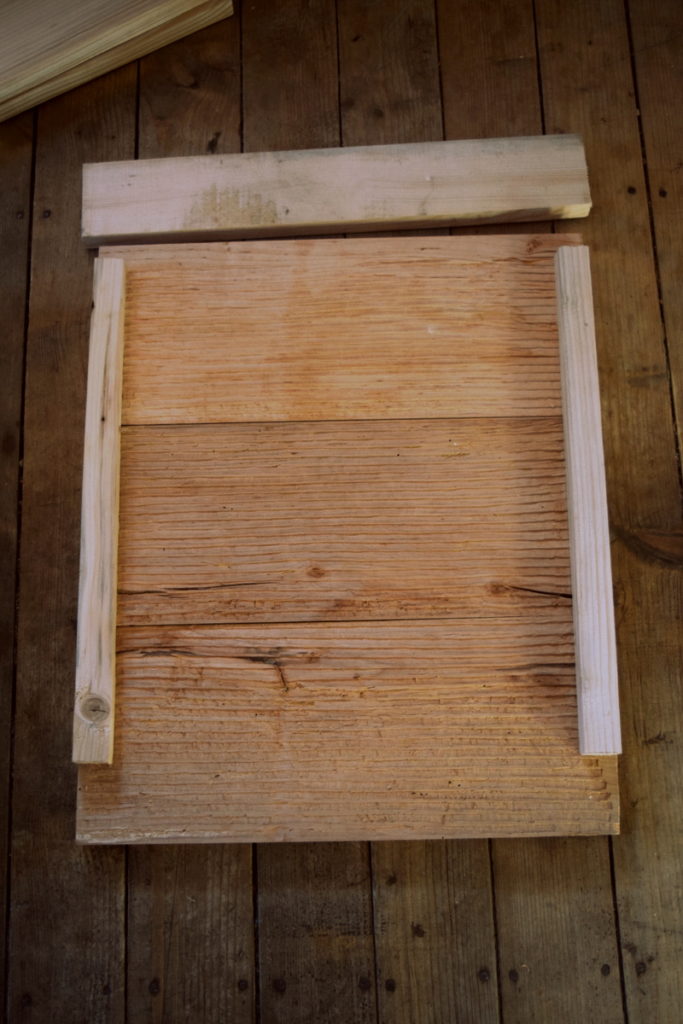
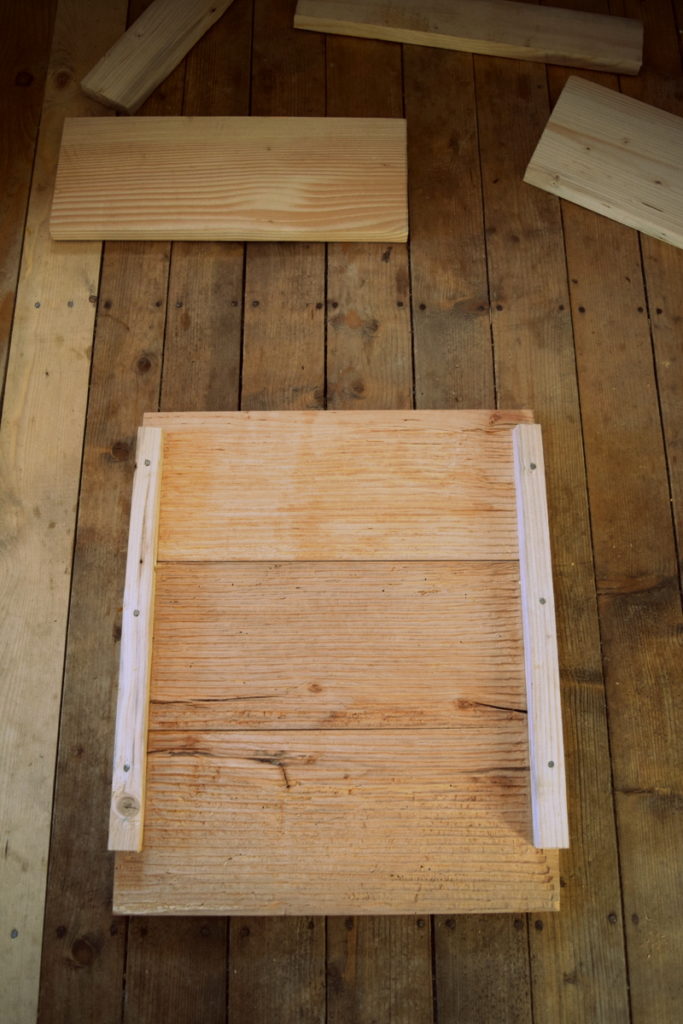
With the set of three back boards side by side, it is now time to hold them together.
The choice to use nails or screws is up to you. Nails may be less complicated to work with, but screws (combined with the use of a power drill) will last longer.
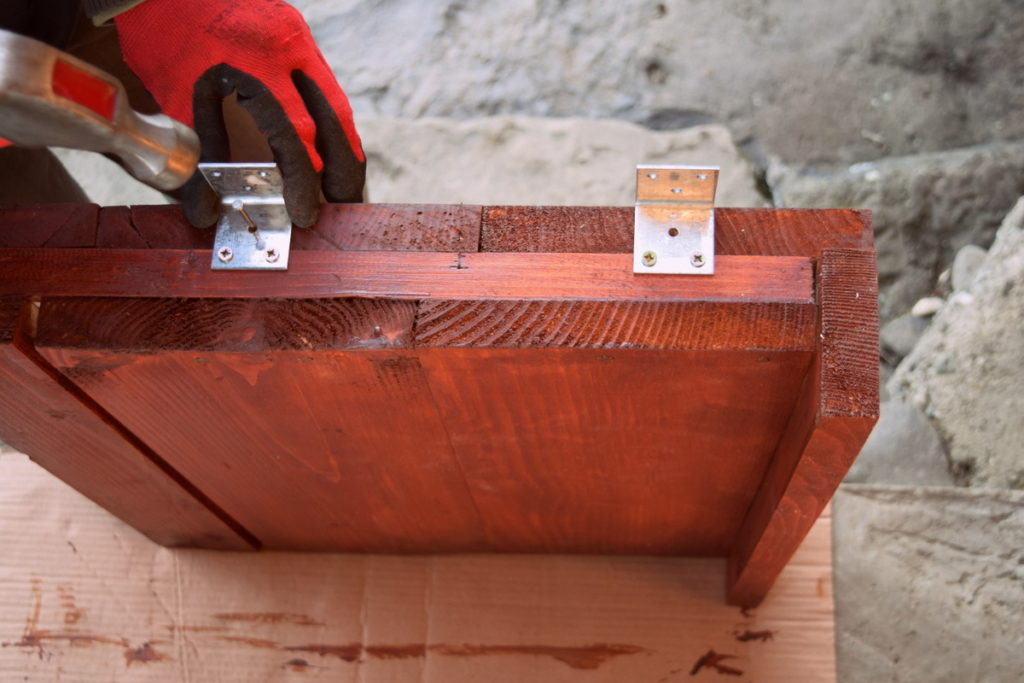
Attaching the pieces of your bat house
Now, that your grooves are done, you can add the side laces. This creates the space for the roosting chamber.
Be sure to drop each piece down from the top (about 1″), leaving just enough space to attach your top cap which prevents water from getting in.
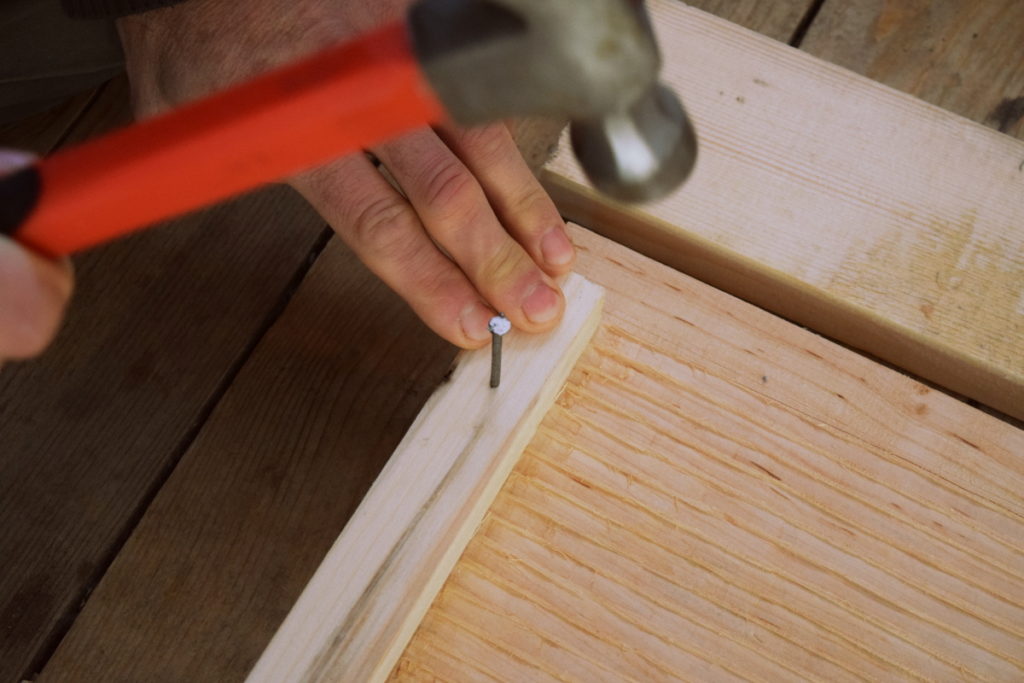
Once both side laces are secured, it is time to add the front pieces of the bat house.
How many nails/screws it takes to put your bat house together, will depend on the wood you are using. Never underestimate physics or aesthetics either.
Next, you can add the 3 front pieces.
Starting from the top (still leaving a 1″ space to attach the top board), secure the two larger boards next to each other.
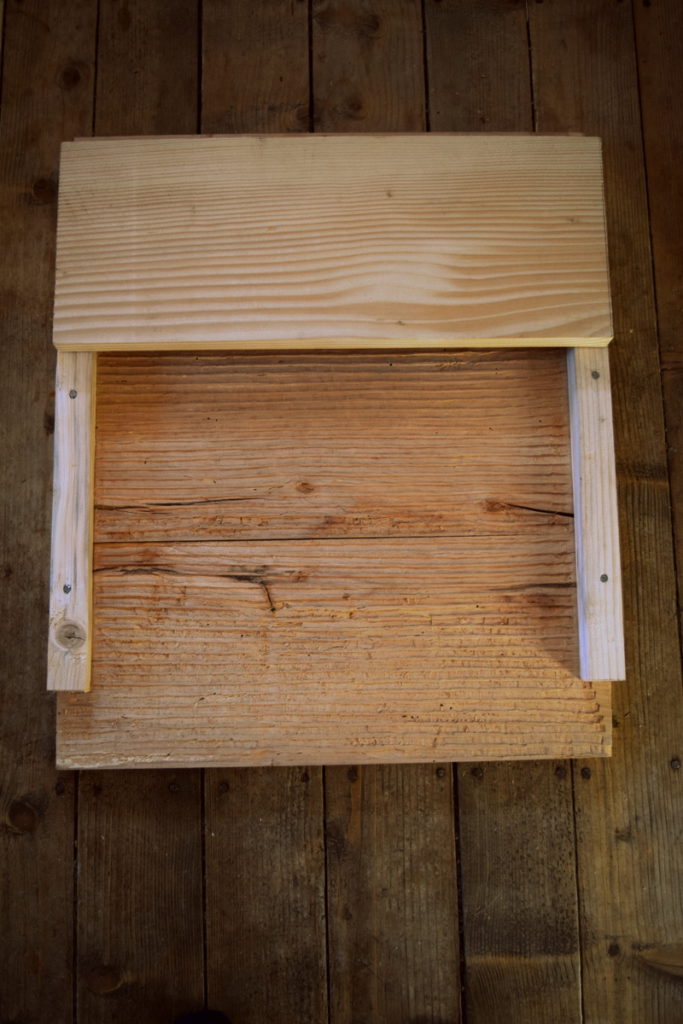
Once all three front boards are attached, you can attach the overhanging top piece.
With the hard work over, comes staining and waterproofing. That’s the fun part of the project – that and seeing the first visitors arriving and leaving to capture their food.
What color to paint your bat house?
Bats prefer heat where they sleep. If you live in a colder climate, such as with four seasons, bat houses need to be painted a dark color.
Grey or darkly stained wood is good. Mahogany is worth a try too. Just make sure that your paint or wood stain is as natural as it gets.
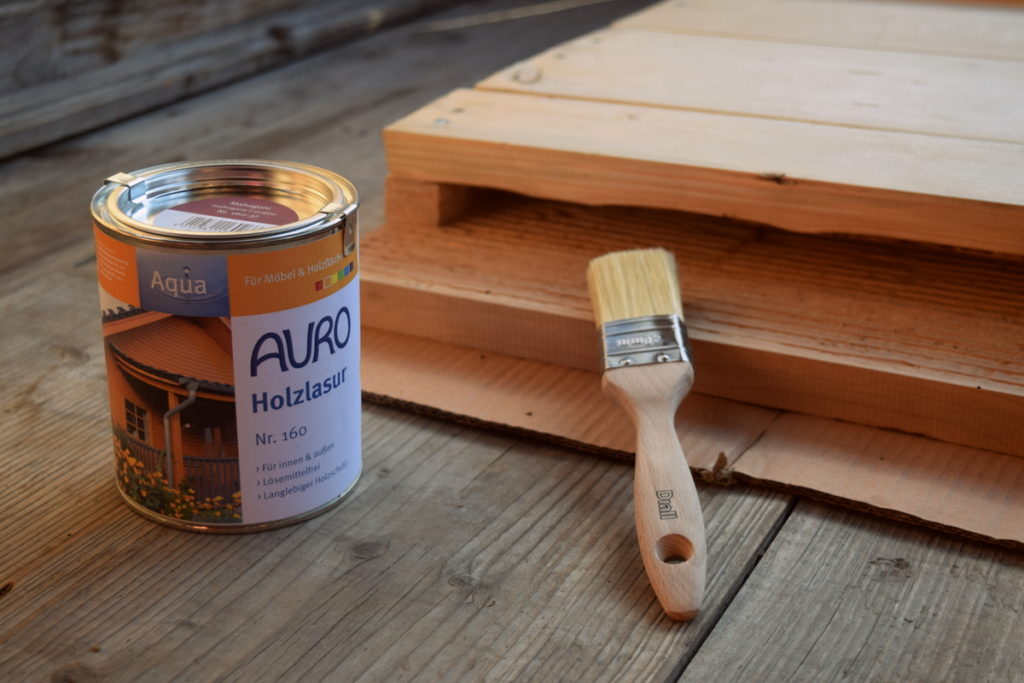
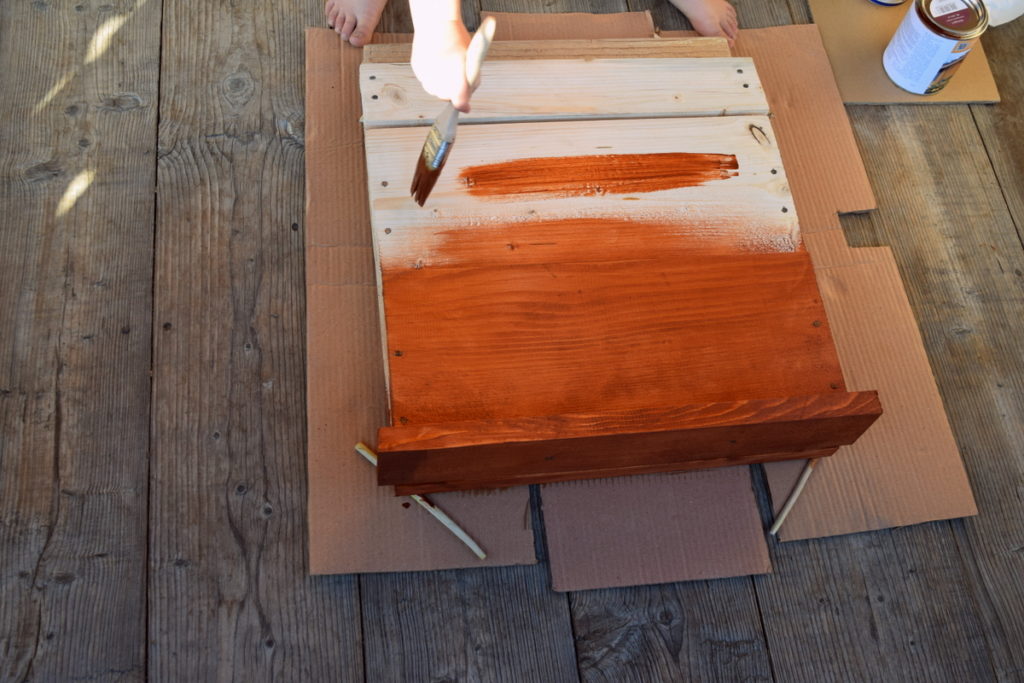
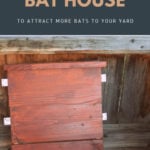
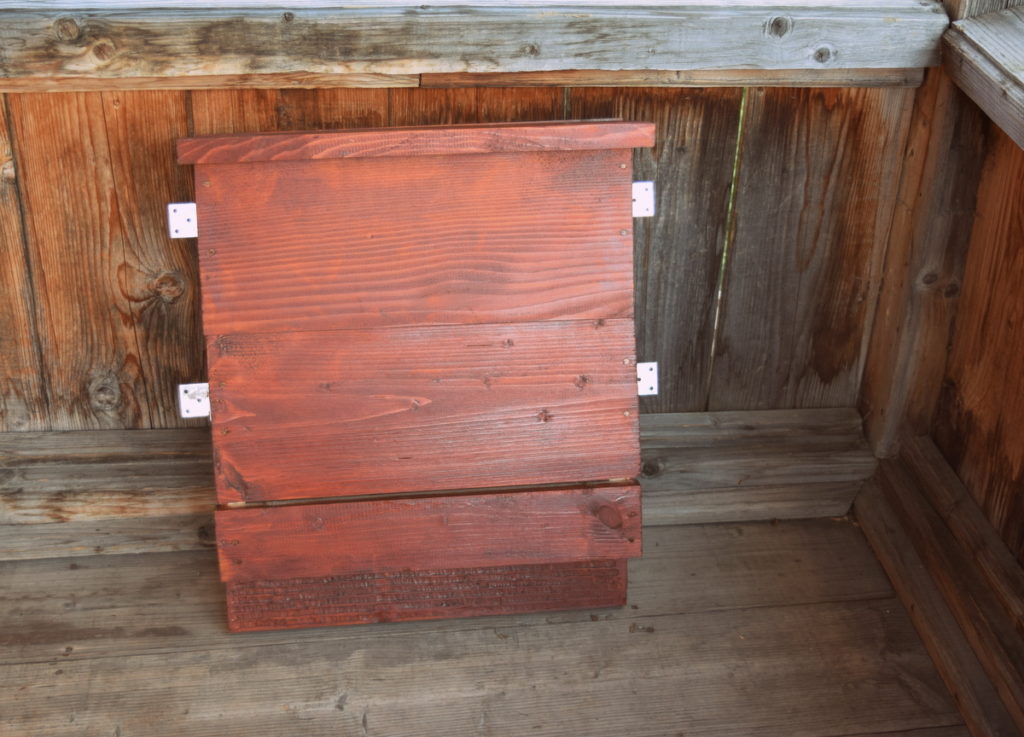
Let this stain dry for a couple of days before adding the L-shaped brackets.
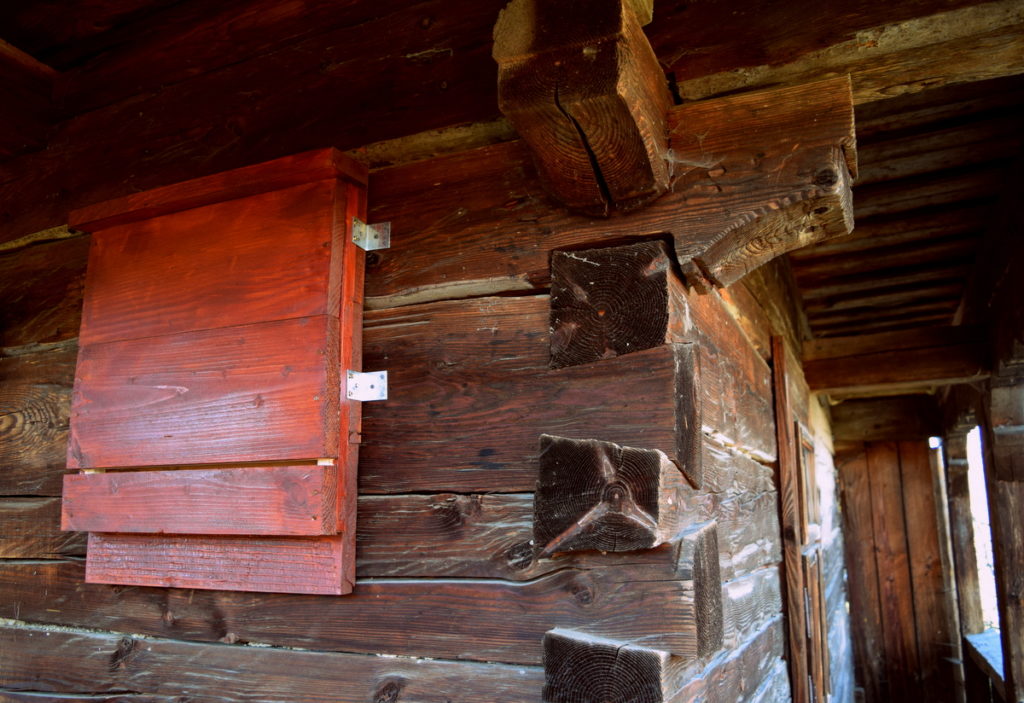
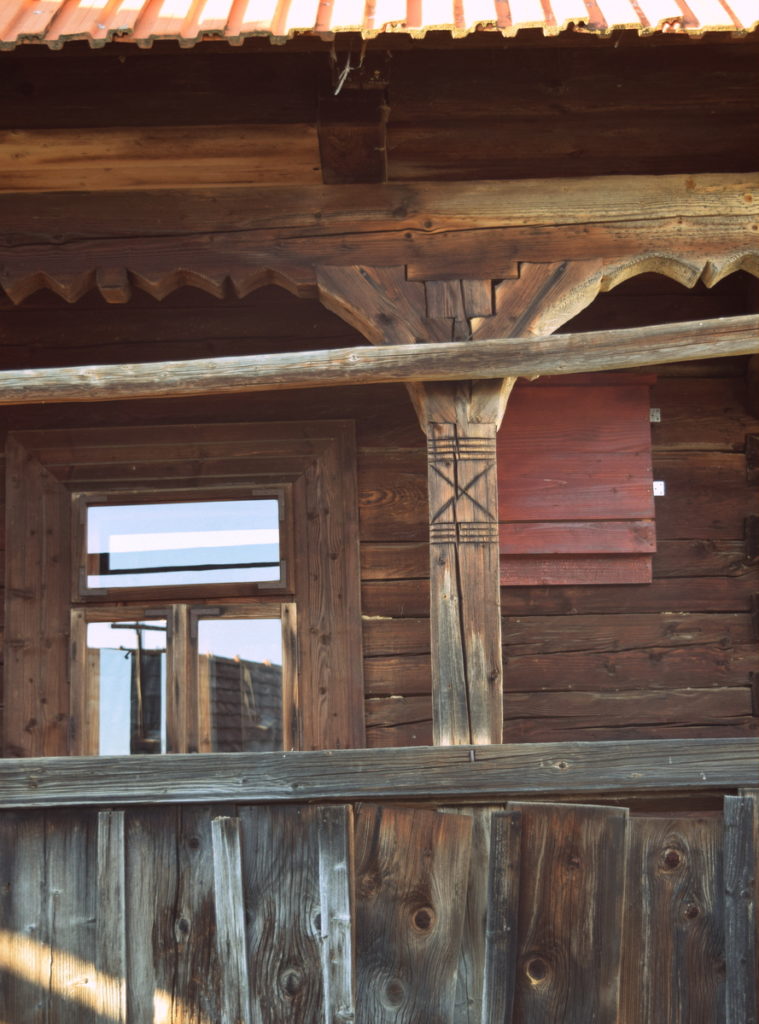
Once your bat house is complete, go ahead and hang it!
Bats will be looking to move in come spring time, so the best time to hang your bat house is late winter or very early spring.
Do you need more than one bat house?
Again, it all depends on how much space you have to offer. And what amenities surround you.
If you already see bats at dusk between spring and fall, chances are better that they will discover your ready-made home. However, if you haven’t seen a bat yet, you can still give it a try.
In the case for trying out more than one bat house, you may find that they prefer a certain color, or a sunnier location, or even a different style of box.
It takes time to attract bats, so don’t assume that you are doing something wrong.
Just wait it out. But, don’t be inactive! Plant attractive flowers in your night garden, install a water feature in your backyard and make sure your garden is as hospitable as it can be for bats.

Get the famous Rural Sprout newsletter delivered to your inbox.
Join the 50,000+ gardeners who get timely gardening tutorials, tips and tasks delivered direct to their inbox.