

I first ran into the concept of using soil blocks when binging market gardening videos on YouTube. Like most home gardeners, I’d originally been introduced to seed starting in cells or plug trays, those modular plastic containers that produce divided plugs for planting out.
I also watched a few gardening shows that featured tips on using seeding trays. The host of the show would blithely sprinkle a small tray with seeds and then a few weeks later, deftly “prick out” the seedlings and plant them out, one by one.
Miraculously, without destroying any of them.
After years of using the first method (and a few years of failing completely and clumsily at the second), my introduction to soil blocking was a revelation.
Unlike traditional methods that involve plastic trays or pots, soil blocks eliminate the need for containers completely. They are a sustainable way to provide young seedlings with everything they need without using more plastic. It also delivers healthy young plants with a reduced chance of transplant shock.
Soil Block Background
I’ve read that starting seeds in small blocks of soil has been used in agriculture for many, many years, but Michael Ladbrooke, an English engineer, is credited with the invention of the modern soil blocker.
Eliot Coleman, an American farmer, popularized the use of blocks in the United States. His advocacy for organic farming methods included the use of soil blocks, which he highlighted as a key component of sustainable horticulture.
Benefits of Using Soil Blocks
Buying a soil blocker can be a significant investment for a home gardener. Depending on how much you grow and how much you depend on a harvest, it may take time before you get a full return on that investment. However, there are some definite advantages to using soil blocks.
Environmentally Friendly
Along with providing an excuse to purchase another awesome garden tool, soil blocking is more sustainable. Using soil blocks reduces my need for plastic plug trays. Considering the number of plants I start year-round, this is a significant number.
Less Work
While I’ve always purchased the sturdiest plug trays I could find and reused them, using soil blocks also means less work. Plug trays must be washed and sanitized between uses.
This means bending over a tub of hot, soapy water, using up more water, and putting extra wear on my back. This strain can add up over time, especially when you’re starting hundreds of plants every season.
Long-term Savings
In the long run, using soil blocks also saves me money. Plug trays do wear out, eventually, even if you’re careful. Exposure to heat, cold, and sunlight work together to make plastic brittle, which means it will eventually crack beyond reasonable use.
Also, since you can purchase soil blockers in a range of sizes from micro (about ½” square) to maxi (about 4” square), you only have to use as much seed starting mix as you need.
Sprouted microblocks handily fit into “mini” (2” square) blocks if they need more room. You can then upgrade the mini blocks to a maxi block if needed. Over time, this saves on wasted soil mix because you only use as much as you need and only when you need it.
Healthier Plants
Using soil blocks produces healthier starter plants than plug trays or pots. The first way they do this is by providing more room for roots to develop. Plant trays are standardized to 10”x20” rectangles, and most plug trays sold for the home gardener are designed to fit 72 seedlings inside those 10×20 trays using 6-cell modules.
In 72-plug trays, the blocks are about 1.5” square at the top and even narrower at the bottom. This doesn’t offer much space for young plants to thrive. Even more importantly, it means you’re rushed to get them planted out before they start to become rootbound or starved of nutrients.
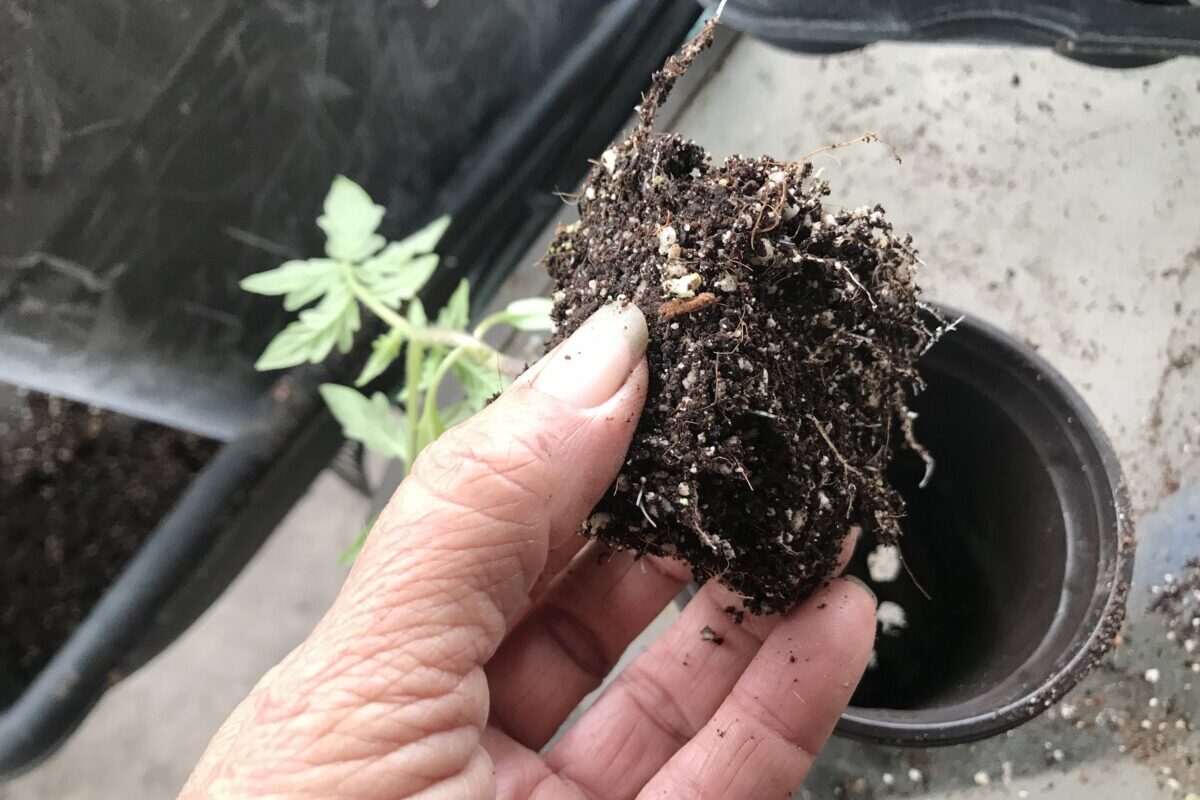
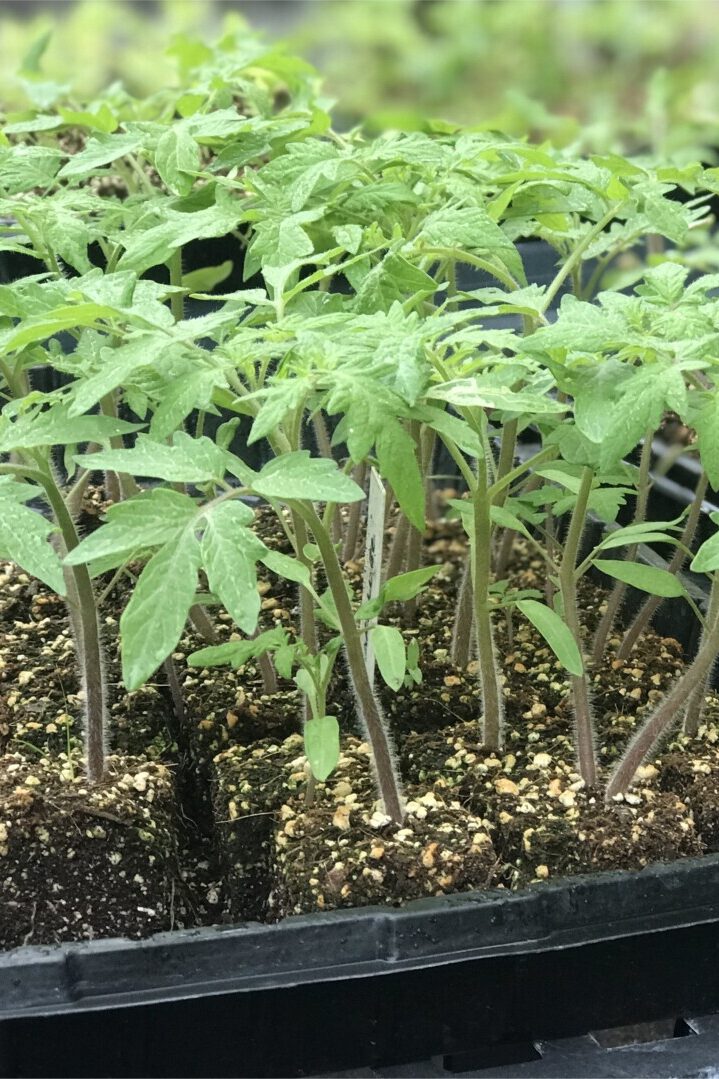
Soil blocks cause “air pruning” in young plants, which means that the roots die off when they reach the air. This forces the plant to develop more fine and fibrous roots, leading to starter plants that are healthier and ready to thrive when planted out.
Using soil blocks also reduces transplant shock. Since there is no disturbance of the roots during transplanting, your starter plants are more likely to hit the ground running with less need to recover from the big move into the garden.
How to Make and Use Soil Blocks

There are a few things you’ll need to have on hand if you want to make and use soil blocks.
- Soil blocker
- Soil block mix
- Mixing tub
- Flat tub or tray for blocking
- Plant trays
- Water
- Seeds
Preparing the Soil Mix
There are several recipes for soil-blocking mix online. The most popular formula making the rounds is the one popularized by Eliot Coleman.
Another recipe you might try is one from Monty Don, featured on Gardener’s World.
I find both of these recipes a bit too complicated for most home gardeners. The Coleman recipe requires peat moss, lime, and colloidal phosphate (green sand), just to start. Aside from trying to avoid peat moss, I rarely have bags of green sand or lime lying around.
The Monty Don recipe requires garden soil and leaf mold. Since I live on Florida sand (not soil), and we don’t have enough deciduous trees to produce adequate amounts of leaf mold. I’ve developed a simpler recipe.
I’ve also chosen more cost-effective amendments for my smaller garden, and I’ve enjoyed success with this mix, modifying it slightly depending on what I’m planting
Basic Soil Block Mix
- 14 parts reconstituted Coconut Coir
- 7 parts coarse perlite
- 2 parts homemade compost (or Black Kow composted manure)
- ½ part Espoma Organic Bio-Tone Starter Plus (any slow-release organic fertilizer will suffice)
High Demand Soil Block Mix
For hungrier vegetables and for those that will be in their blocks for more than 6 weeks, such as peppers and tomatoes, I provide some additional nutrition.
To the basic mix, I add:
- ¼ part Blood Meal
- ½ part Bone Meal
Mixing Ingredients
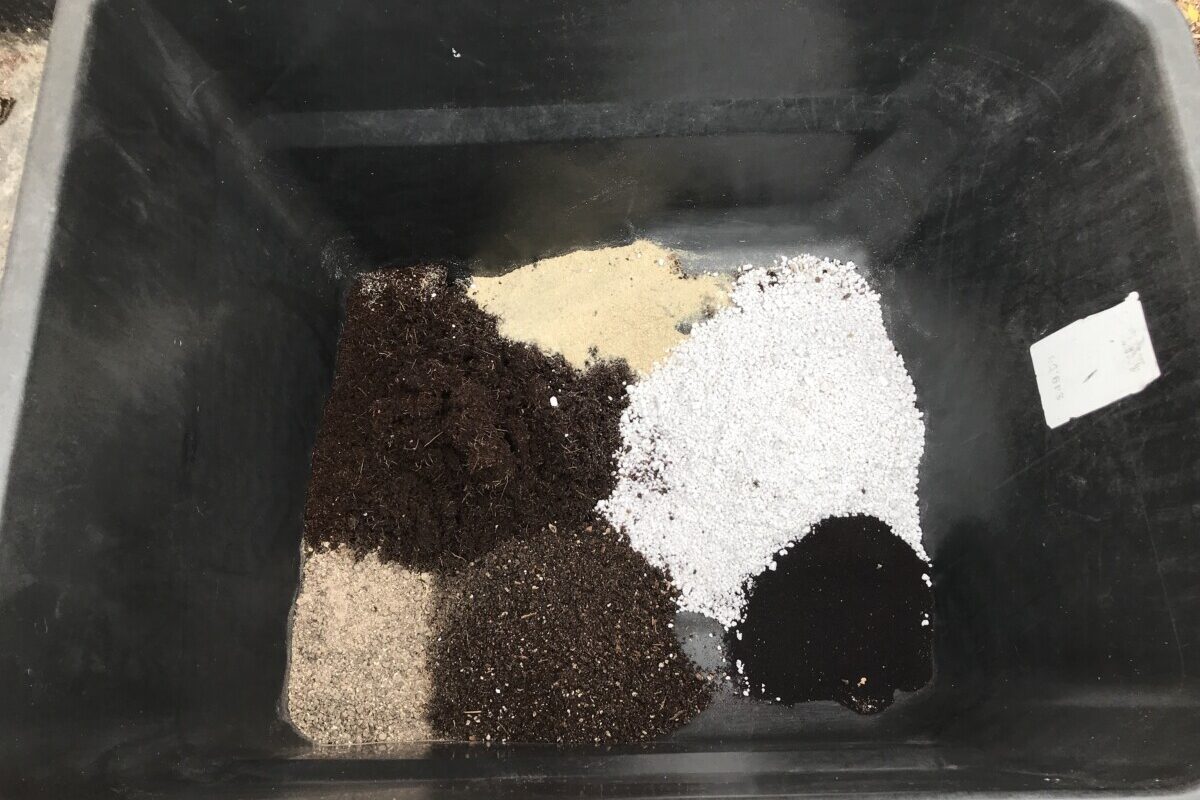
Using a tub or wheelbarrow, I add all the ingredients and mix thoroughly. It’s a good idea to use a disposable mask when mixing because the perlite, in particular, can be extremely dusty and irritate your lungs.
When available, I also add 1 part worm castings for an extra boost of nutrients and beneficial microbes.
It’s important to mix the dry ingredients thoroughly to ensure all the fertilizer and amendments are well incorporated.
You can store your soil-blocking mix in a moisture-resistant tub or bucket with a lid until needed.
Preparing the Soil Mix
The trickiest part of soil blocking is finding the sweet spot for adding water. This is truly where experience is the best teacher.
Place your dry ingredients in some kind of container or tub with a flat bottom. I found a flat-bottom concrete mixing pan from the feed store, and it worked well for me.
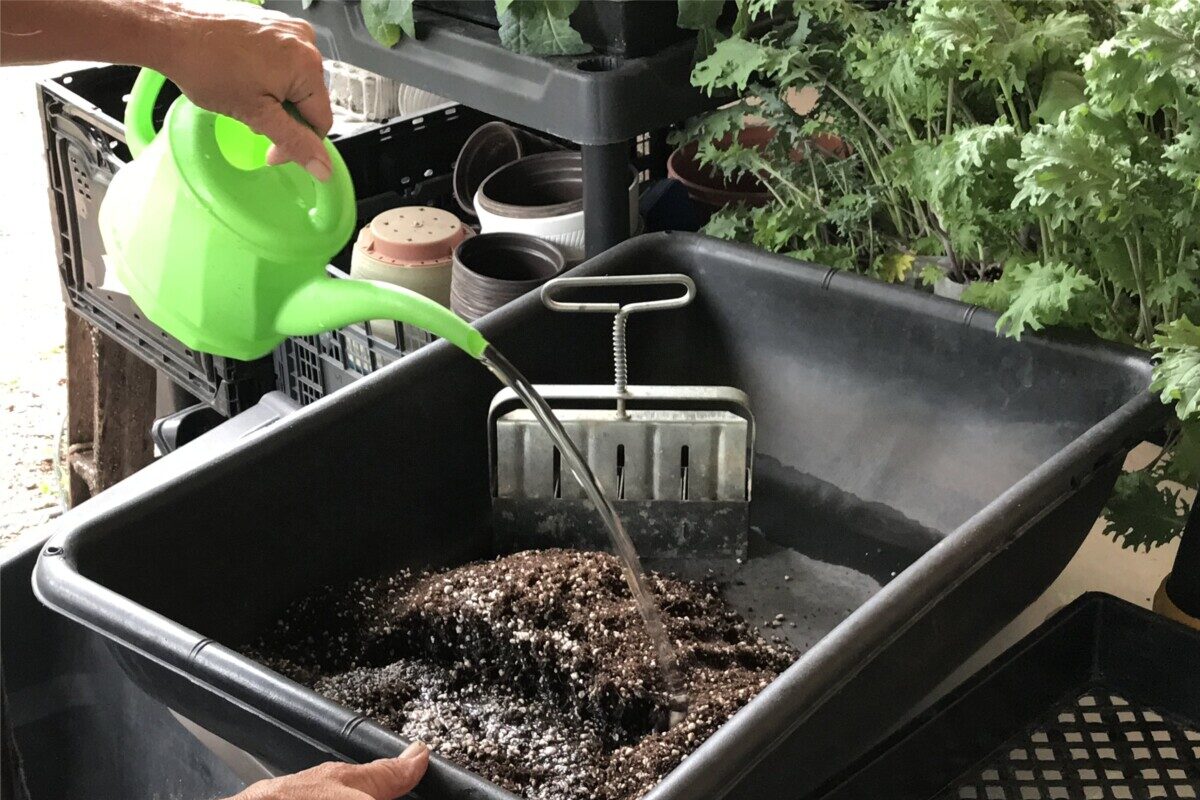
Next, add some of your dry soil-blocking mix to your pan and add water — lots of water.
This is the tricky part — knowing how much water to add.
You want the soil mix to be very, very moist. It will need to be much wetter than you would normally use in cell trays.
The purpose of the compost and the coconut coir is to work as a binder for the blocks, but you’ll need plenty of water to swell the fibers and activate them.
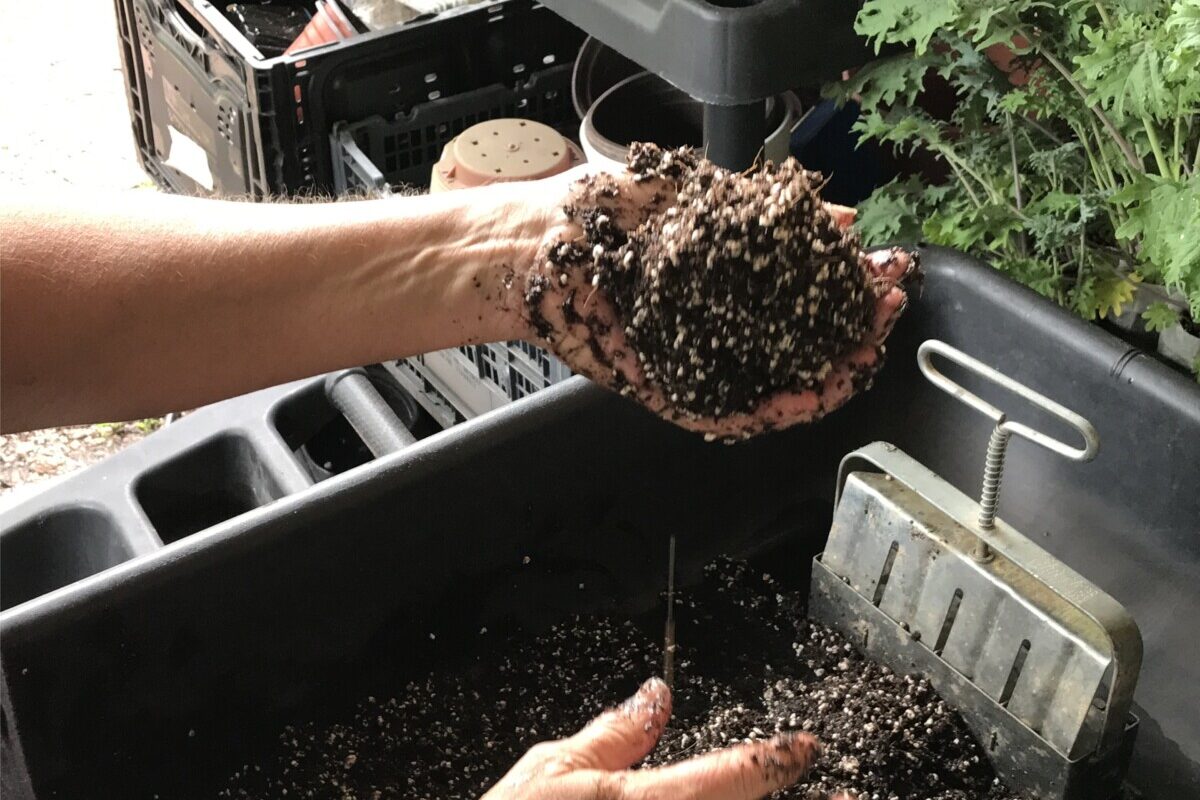
You want it to be the consistency of thick, wet concrete, and when you squeeze it into a ball with both hands, some water should drip out, and it should hold its shape when you release pressure.
The sweet spot is somewhere between a wrung-out sponge and soaking wet.
If the mixture crumbles apart easily when you block it, it isn’t wet enough. If it dissolves and falls apart, it is too wet.
By only preparing some of your soil mix at a time, you can recover from either situation easily by adding a little more dry mix or a little more water. That’s why I don’t prepare a whole batch for blocking at once.
And, of course, if the blocks don’t hold together, you can dump them back into the mixing tub, add what’s missing, and try again. You can also let the mix dry out for a day and try again. Practice makes perfect.
Making Soil Blocks

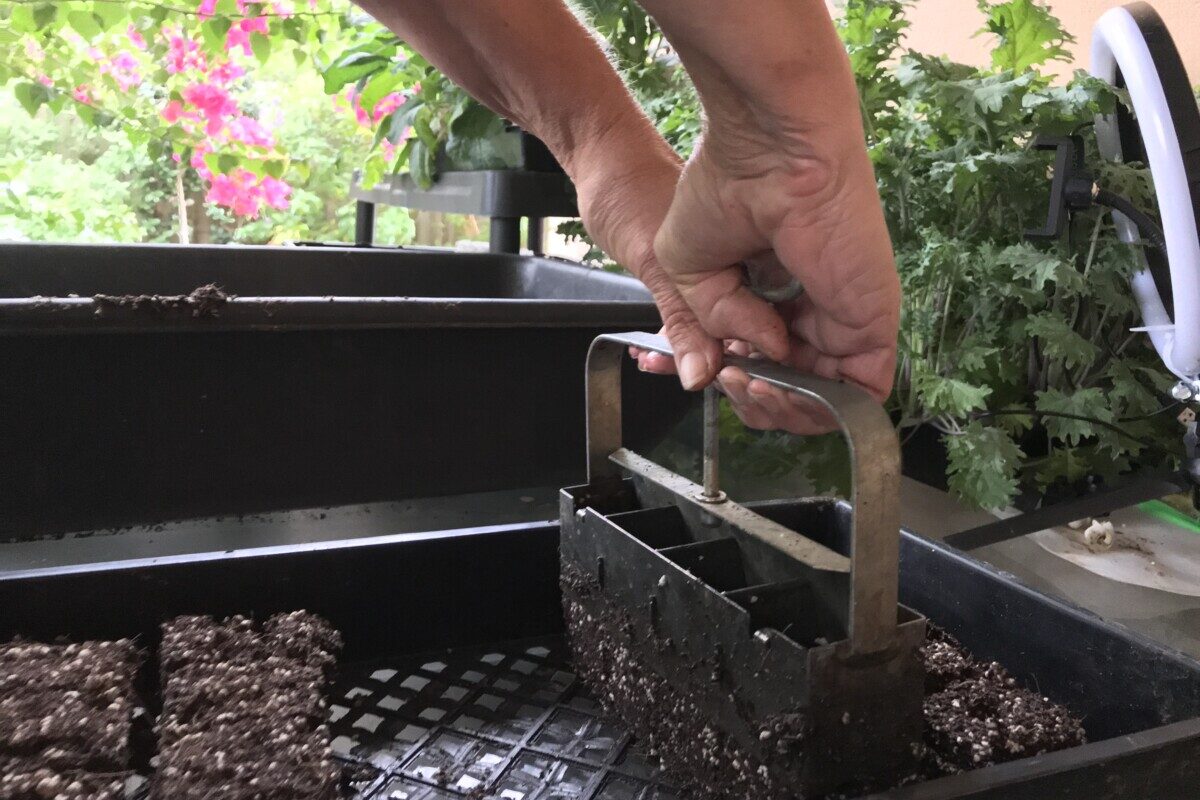
While you’ll find plastic soil blockers on the market, metal models tend to work more smoothly. I’ve struggled to get the soil to slip out of the plastic ones neatly.
Metal soil blockers often come with little seed-pin dibbers, which leave an indent for dropping the seeds. A good set will come with interchangeable dibbers for seeds of different depth requirements.
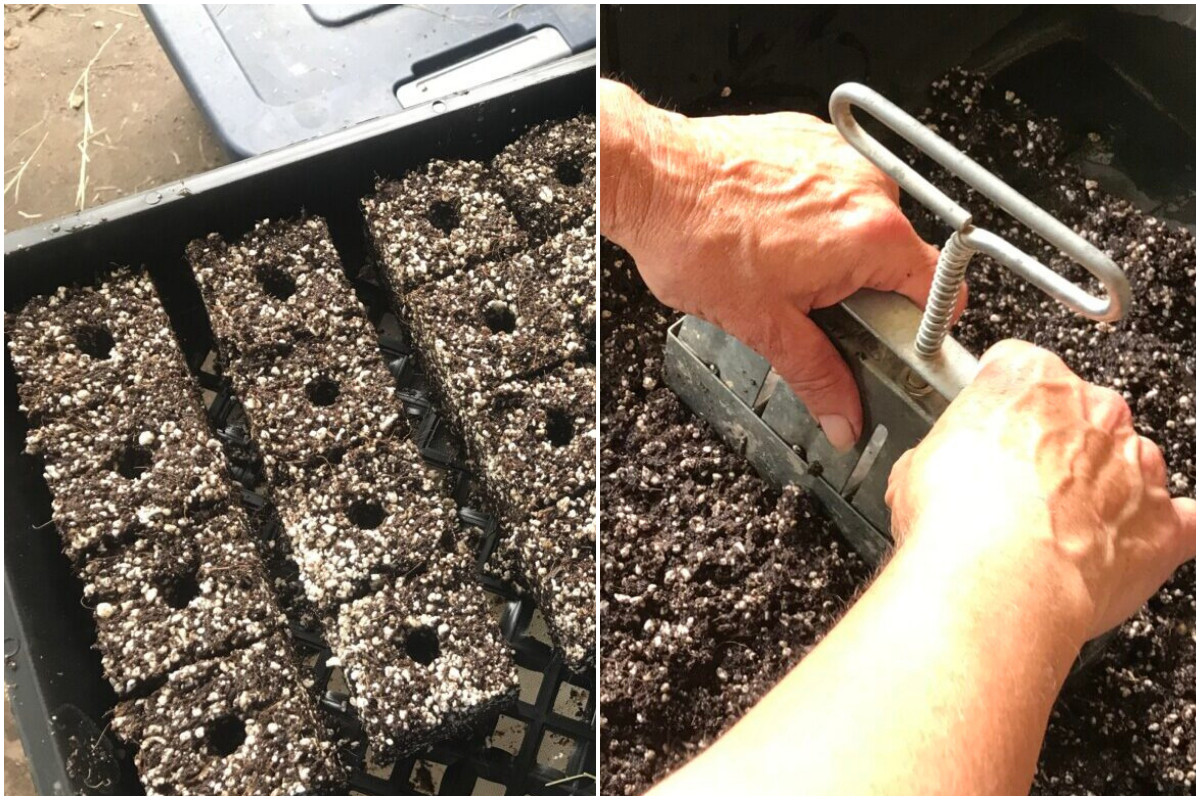
You want to press the soil blocker into the mix, rocking it back and forth and lifting the blocker while scooting more soil into the blocks to load it firmly with the soil.
You may need to press it several times into the mix, pressing it firmly to ensure the soil is compacted into the squares.
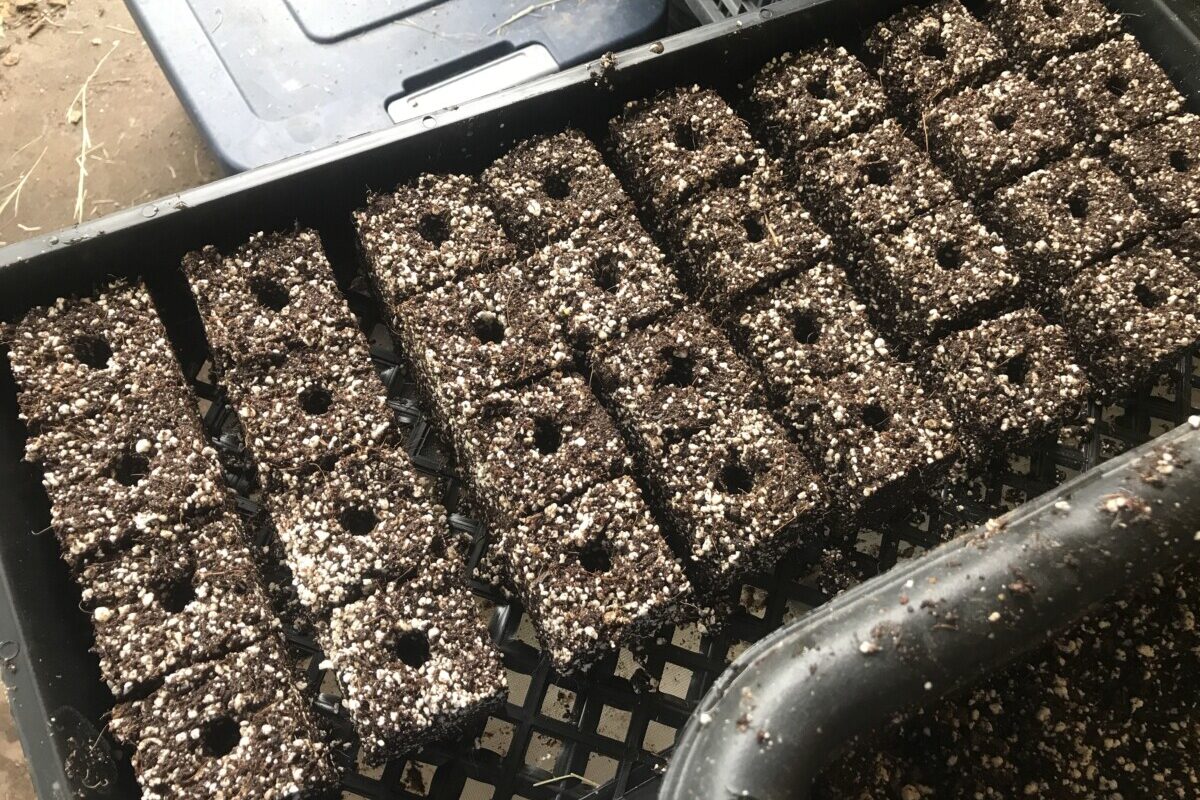
Carefully scrape any excess off the sides and press it onto the holding trays you’ve chosen for your soil blocks.
I use trays with a poly mesh on the bottom for better drainage, but any kind of tray will do. I’ve even recycled plastic meat trays from the grocery store and used them for holding a few lines of soil blocks.
Depress the lever firmly, which compresses the soil blocks even further. You may see some moisture draining from the soil as you press. This will help firm and disgorge the soil blocks.
Gently lift the blocker straight up.
I keep a bucket of water nearby for rinsing the blocker. Rinsing it regularly helps to ensure that the soil blocks slide out smoothly.
As you continue to fill the tray with soil blocks, make sure you leave some space between them so they’re not touching each other. This allows air to circulate to ensure “air pruning” in the future.
Seeding the Blocks
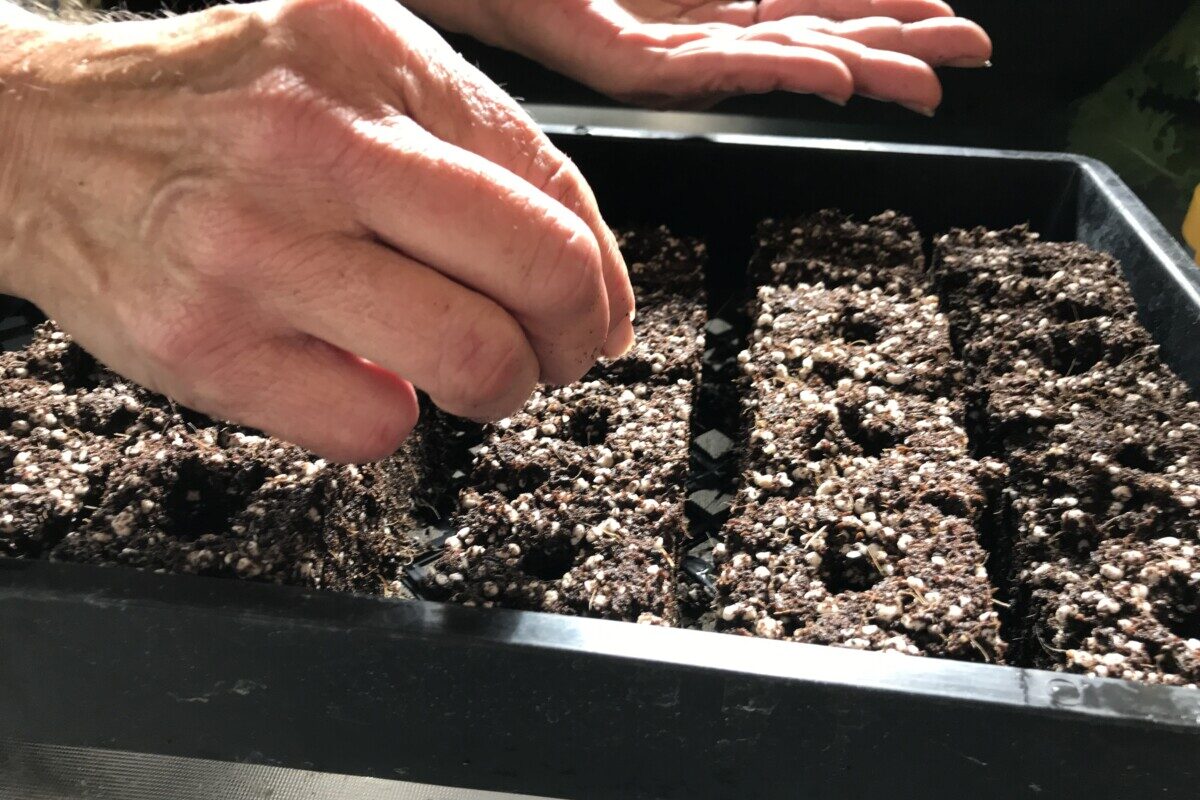
Place your seeds in the indentation of each block. If the seeds are tiny, you might just sprinkle a few on top. For larger seeds, one seed per block is sufficient.
My advice is to provide big seeds like those for pumpkins and watermelons with the largest blocks possible. If you’re only starting a few plants, however, sometimes 3” pots are a better choice than soil blocks.
Gently cover the seeds with a thin layer of your dry soil mix. Some seeds need light to germinate and shouldn’t be covered and you can simply press them gently into the soil surface.
Caring for Soil Block Starter Plants
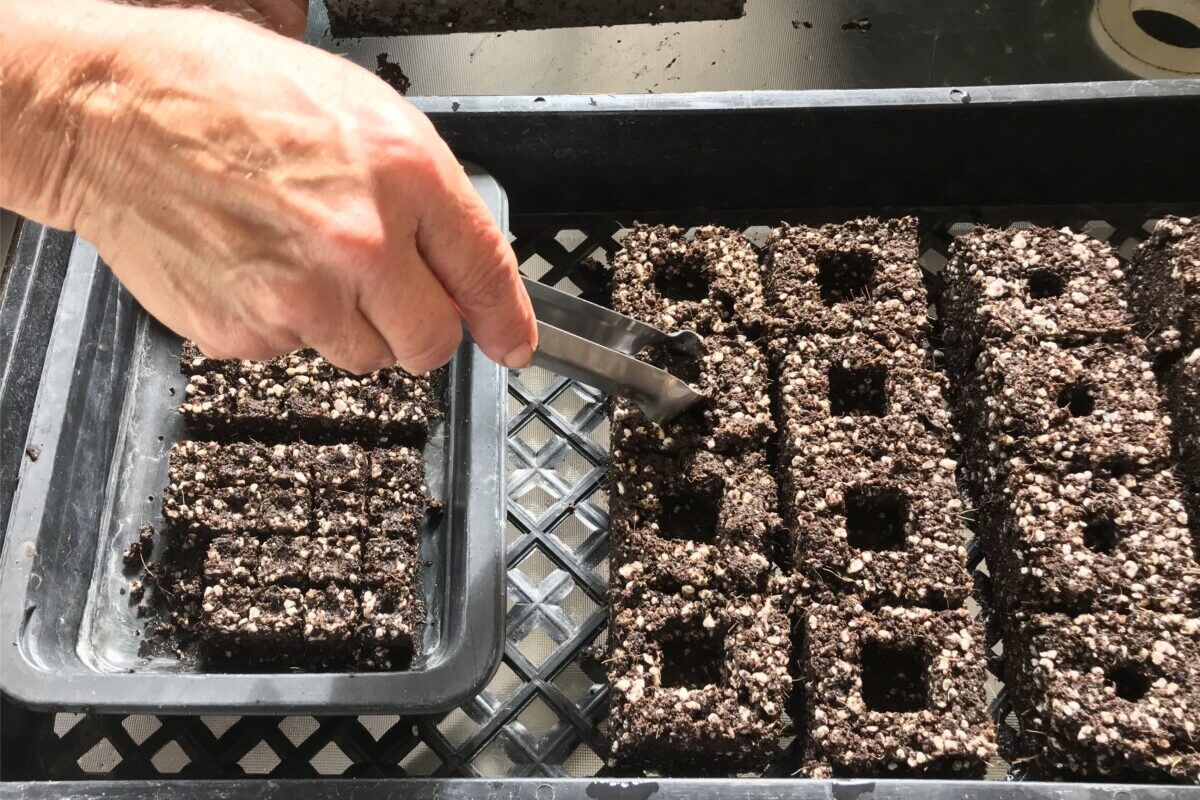
When made properly (and with enough coconut coir), soil blocks are less fragile than you’d think. Once they’ve dried out a little, you should even be able to pick them up and move them, if necessary.
Don’t be afraid to water them when needed. Use a fine mist setting on the hose to prevent eroding the blocks.
One of the reasons I make my soil blocks in mesh-bottom trays is so I can easily bottom-water them by placing the entire tray into a 10×20 tray filled with clean water for a few minutes.
The other advantage is that I can also feed them that way with a diluted liquid fertilizer if planting out is delayed due to weather.
Place your trays in the appropriate conditions for the seeds planted, including temperature and light exposure. Follow any further recommendations according to the seeds you’re growing.
Tips for Soil Blocking Success
The consistency of the soil mix is key to forming sturdy soil blocks. However, ambient conditions can affect how much water you need to add on any given day. With practice, you’ll develop a good feel for how the soil mix should look and feel to make sturdy blocks.
Make sure you monitor moisture levels daily, as soil blocks may dry out faster than traditional plug trays.
This is sometimes, but not always, made up for by the greater amount of soil in a block than in any cell.
If your long-season vegetables or larger plants seem to be outgrowing the size of their soil blocks, you can make them bigger manually.
Jesse Frost, host of the No-Till Growers podcast says that he sometimes just creates soil blocks by forming them with his hands. He uses this technique to increase the size of the blocks for larger plants.
So, even if you only want to invest a little money into experimenting with soil blocking, you only need one of the minis. This size works for starting nearly any plant, making it the most useful size to get started.
Creating soil blocks is a bit of an art and may take a few tries to perfect. However, once you get the hang of it, it’s an incredibly rewarding and sustainable way to start your garden.
No Such Thing As “Perfect”
That doesn’t mean there aren’t any downsides to using soil blocks.
The two most common obstacles to using soil blocks are the initial cost of equipment and the time needed to perfect the technique.
However, soil blockers now come at several different price points. I even tried out a plastic low-cost model before upgrading to the original Ladbrooke kit.
As for technique, nothing in gardening is ever perfect, and while there is a learning curve, it’s not a dangerous one.
The most useable soil block is sturdy and holds up to the pressure of root growth. You should even be able to pick them up and move them without crumbling. That’s a “perfect” soil block, but until you get a better feel for making them, there are ways to make them work for you.
- When you first get started, make sure you use a sturdy tray to hold the blocks. This will do to ensure they hold together until you perfect your mixing skills.
- Use bottom-watering only to prevent eroding the blocks.
- Remember that you can always transfer an overgrown seedling into a small pot, if necessary.
Will Soil Blocks Work in Your Garden?
You may find using soil blocks more labor-intensive compared to using traditional seed trays. In my experience, though, that’s only true if you’re new to the method or need plant starts on a much larger scale than most home gardeners.
Soil blocks offer a sustainable and effective way to start seeds for your garden. While there is an initial investment in equipment and a learning curve, the environmental benefits and the increased health of your starter plants make it worthwhile.

Get the famous Rural Sprout newsletter delivered to your inbox.
Join the 50,000+ gardeners who get timely gardening tutorials, tips and tasks delivered direct to their inbox.