

Blueberries and basil go together like peanut butter and jelly. This flavor combo pops up everywhere these days, and for good reason.
A couple of summers ago I was inundated with blueberries, and I got the wild idea to try making a blueberry basil mead with my bumper crop. (Do you want to be inundated with blueberries too? Follow my secrets here.)
Blueberry Basil Mead
Yes, you heard me right, and yes, it’s as good as it sounds.
I had made blueberry mead before, and it’s always quite tasty. But I wanted to see if I could capture that magical combination of fruit and herb.
I had no idea if the basil would ferment out completely, overpower the blueberry, or just be a weird vegetal note in my finished mead. But I figured it was worth trying a one-gallon batch.
And this, my friends, is the beauty of making one-gallon batches when homebrewing – it’s inexpensive, and if you get a dud, you don’t feel bad about dumping the whole thing.
Okay, you don’t feel as bad about dumping the whole thing.
Lucky for you and me, the finished blueberry basil mead was anything but a dud.
In fact, this might be the best mead I’ve ever made. It’s earned its spot on the ‘make a batch every year’ list.
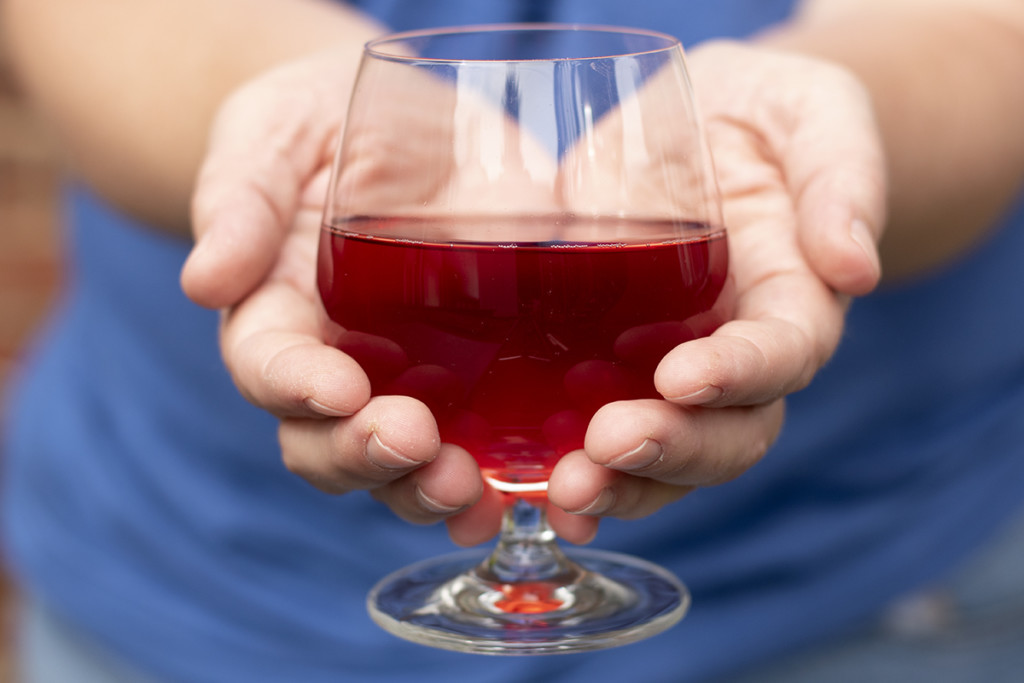
The color is gorgeous; the blueberry is sweet and bright, the honey adds a warmth to the fruit, and the mead finishes with just a hint of pungent basil. It’s perfection, and I can’t wait for you to try it.
Even if you’ve never brewed a single thing in your entire life, you can make blueberry basil mead.
(And impress the heck out of your friends and family.) When it comes to homebrewing, I’m all about keeping it simple and easy.
Technically, this is a melomel. What’s a melomel, you ask? It’s a mead that’s fermented with fruit. Why not grow your own blueberries so you too can make this mead every year?
For this melomel to reach peak flavor, it takes about a year. I know, I know. That’s a long time to wait.
But whenever I make a batch of wine or mead, I tell myself that year is going to pass whether I make mead or not. I can either be sipping a glass of my mead in a year or wishing I was.
And let’s be honest, that year is going to slip by pretty quickly anyway.
A few notes before we begin –
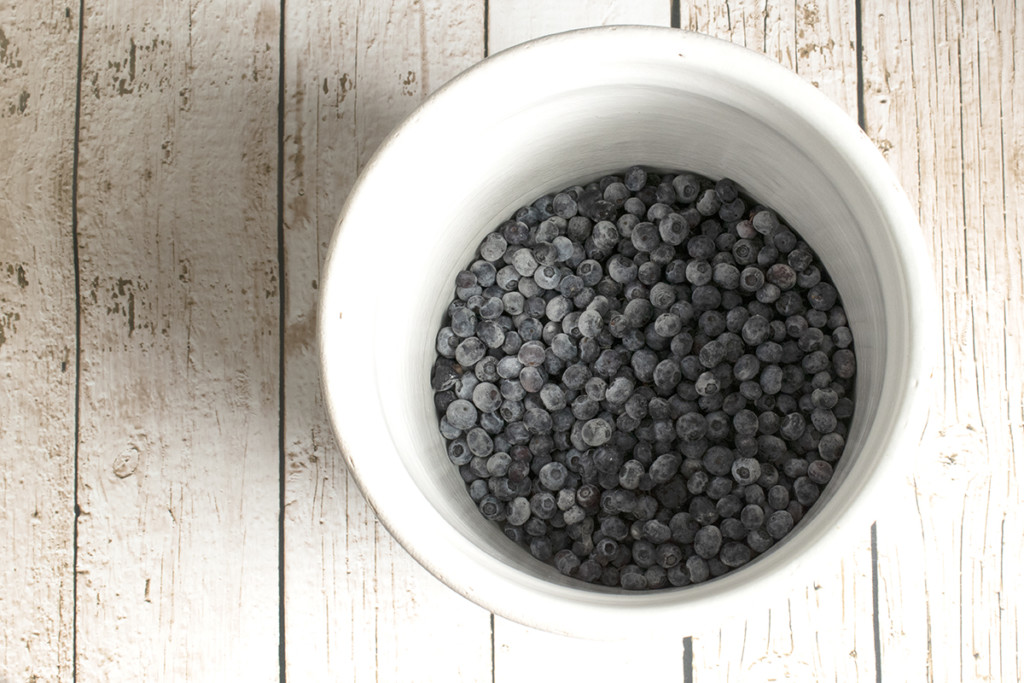
- Rinse your fruit well and pick out any leaves, stems, or bad berries.
- Always freeze your fruit beforehand. I picked this little trick up along the way, and it’s served me well over the years. Freezing your fruit before you use it helps to break down the cell walls of the berries, which means it releases more of the sweet juices inside. Hint – this works well for jams too.
- Use local honey if you can get it. It’s wonderful to experience the full flavor of the land where you live in your finished mead – from berries to honey.
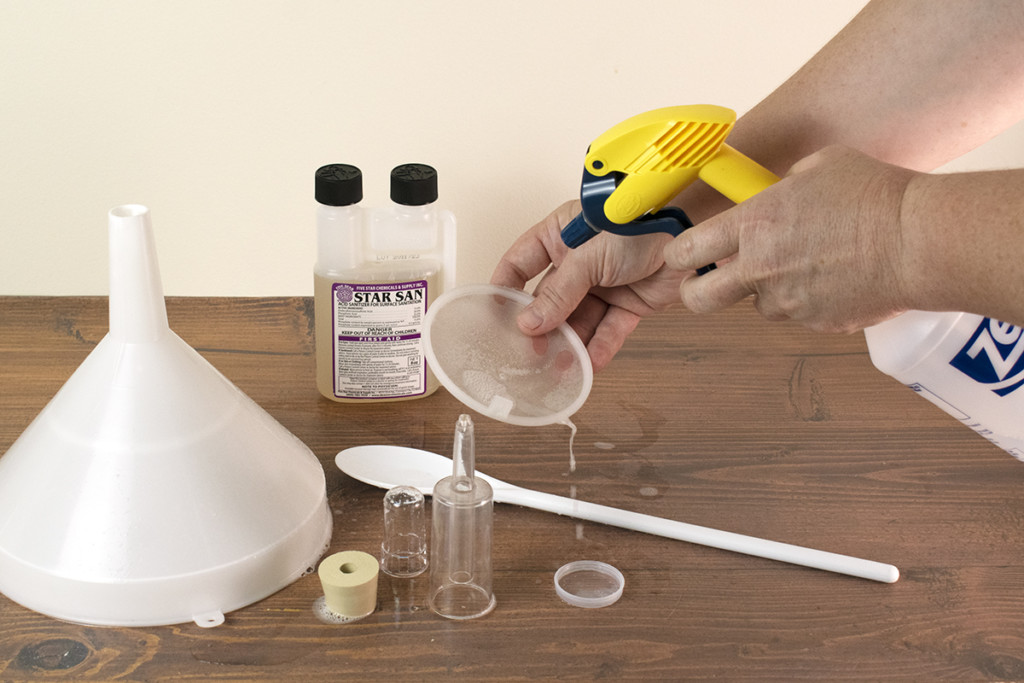
- Always start with clean, sanitized equipment for every step of the process. I prefer Star San because it’s a no-rinse sanitizer and it’s cheap. And remember, I’m all about easy. Mix the Star San in a spray bottle and spray your equipment well (inside and out), then find something better to do with your time while it dries.
- Whenever you homebrew, keep good notes while you’re working. Use a notebook or a Google spreadsheet. Good notes make it easy to repeat something if you get a good batch. Like, say, a hair-brained idea to make blueberry basil mead. I don’t know how many times I’ve started a batch of something only to have no clue what yeast I used or how many pounds of honey I put in it because I was going to “write it down later.” Don’t be me.
What you’ll need:
As far as brewing equipment goes, the list is pretty short. All of these items can be purchased at your local homebrew store or at an online homebrew retailer (I love Midwest Supplies) or Amazon. And the best part is, once you’ve purchased these items, you can make batch after batch of wine, mead, or cider.
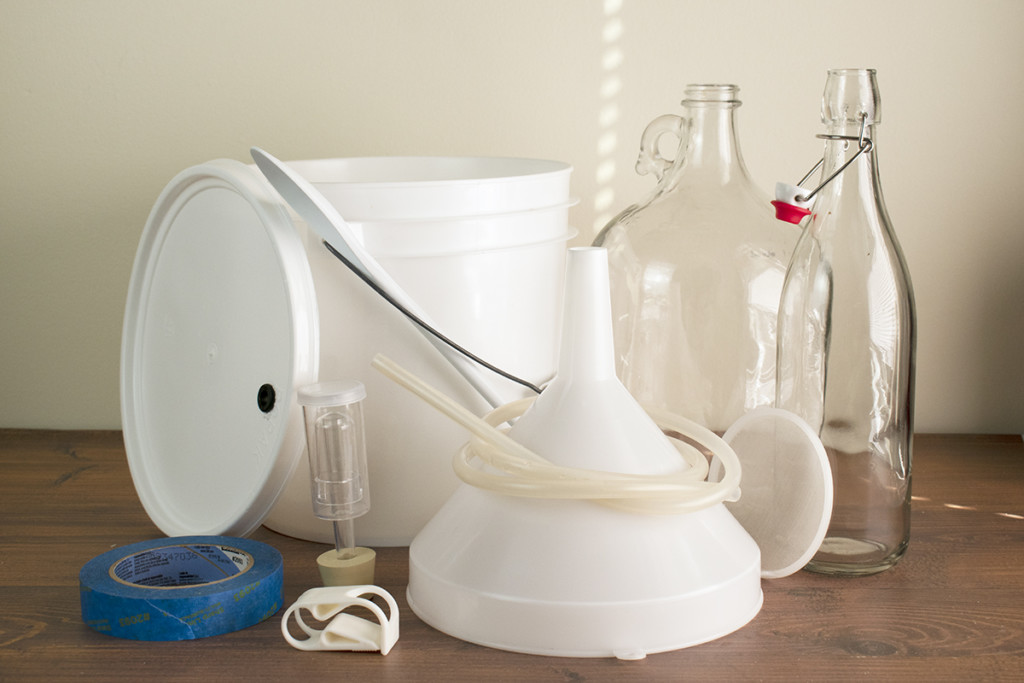
Brew Equipment:
- 2-gallon brew bucket Or if you want to get fancy and enjoy being able to see the fruit fermenting, pick up a Little Big Mouth Bubbler. You can also use a stone fermenting crock if you have one, as I did.
- One or two 1-gallon glass carboys (having two will make your life so much easier, you’ll see why further down below.)
- 8″ Funnel with screen that fits a 1-gallon carboy
- 3-4 ft length of food-grade vinyl or silicone tubing
- Hose clamp
- #6 or 6.5 drilled bung
- Airlock
- Something to bottle your finished mead. (Don’t worry if you don’t have anything right now. You’ve got six months before you’ll need to worry about bottling.) For mead, I prefer a swing-top style bottle. It’s easy to use, and you don’t need to replace corks or purchase a special corker.
Other equipment:
- Long-handled non-metallic spoon
- Liquid measuring cup
- Potato masher – optional
Blueberry Basil Mead Ingredients:
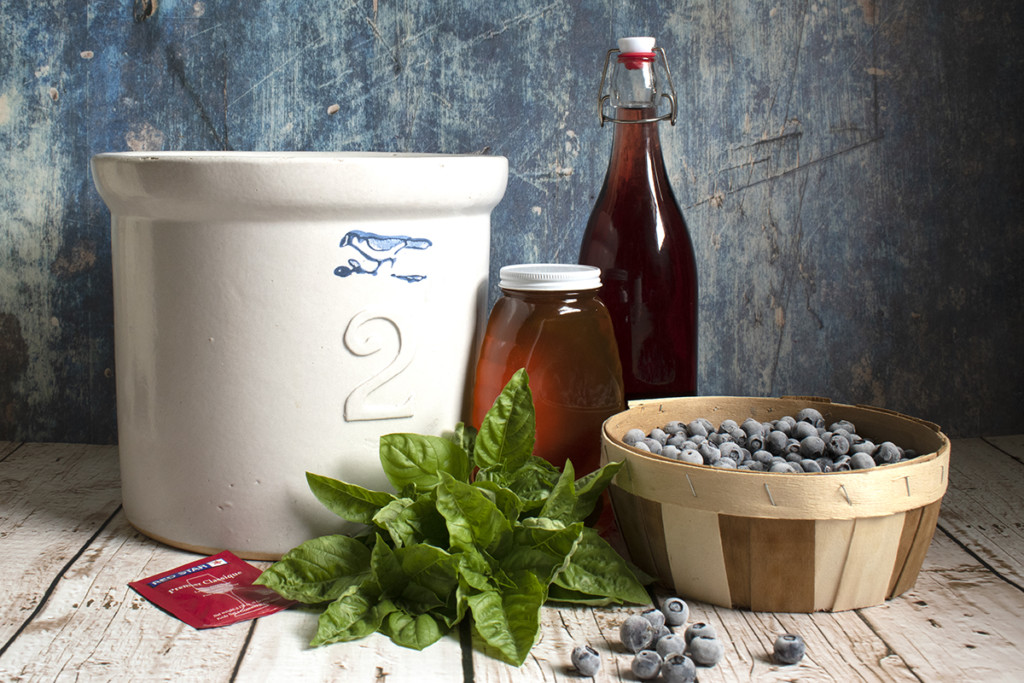
- 2 lbs. of blueberries (Yes, you can use frozen store-bought blueberries.)
- 4 lbs. of honey
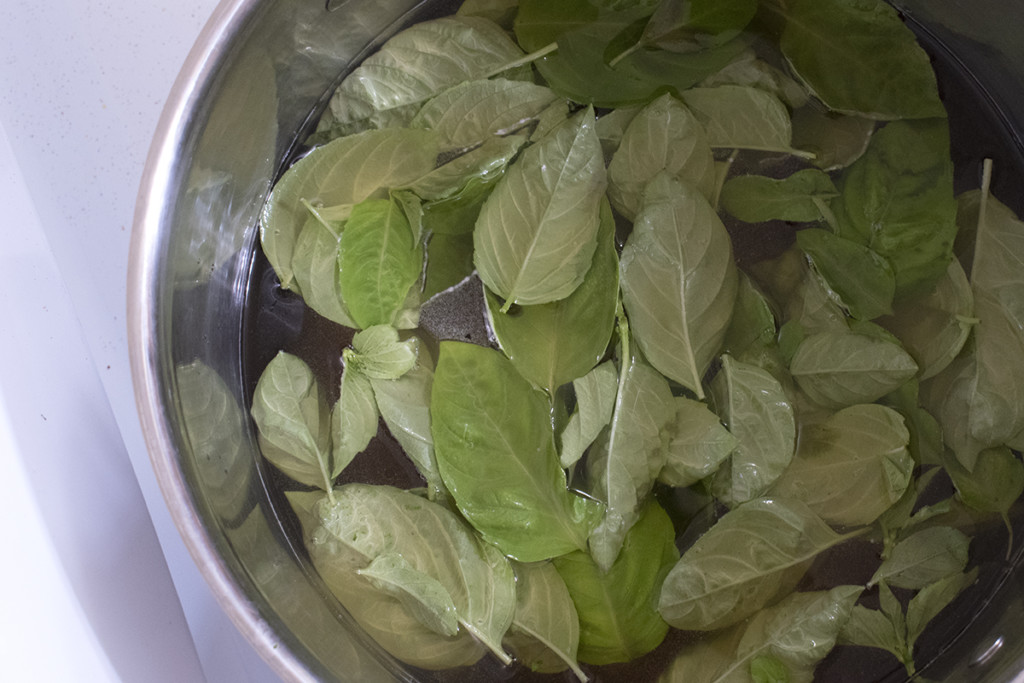
- 1 cup of (lightly packed) fresh basil leaves
- 10 raisins
- A pinch of black tea leaves
- 1 gallon of water
- 1 packet RedStar Premier Classique (Montrachet) wine yeast
Okay, now that you’ve gathered your sanitized equipment and ingredients, let’s make a batch of blueberry basil mead.
Making the Must and Primary Fermentation
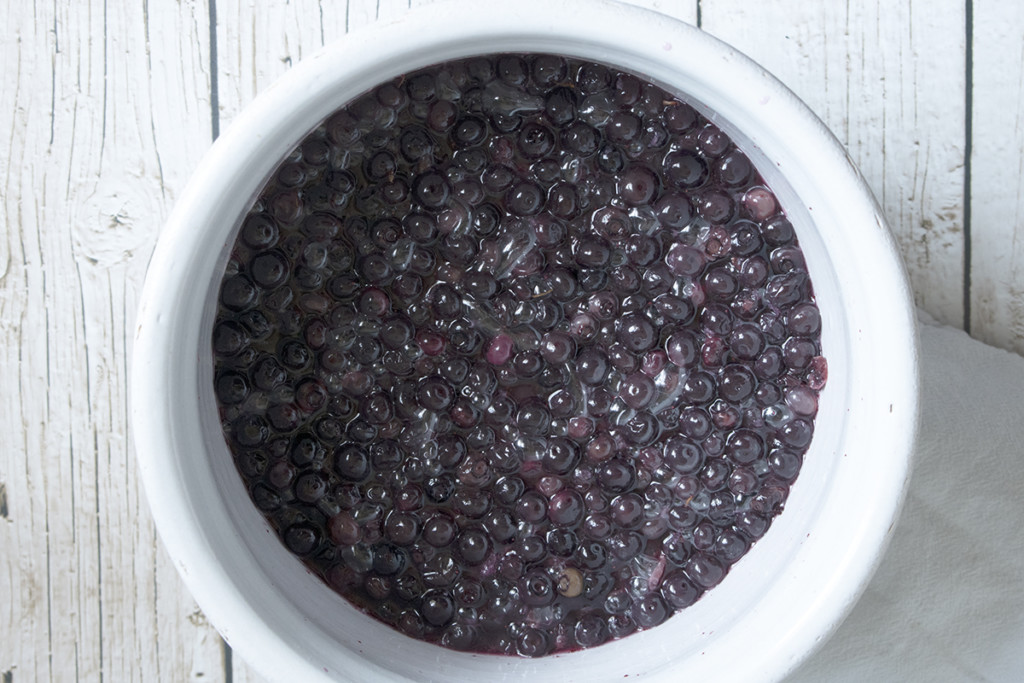
To begin with, put your frozen blueberries in the brew bucket and allow them to come to room temperature.
In a large pot, bring all but two cups of the gallon of water to a boil. Set the reserved two cups of water aside; you’ll need this later. Add the honey to the water and boil gently for five minutes. As the honey is heated, the remaining beeswax in it will melt and come to the surface, forming a foam. Skim this foam off as it develops.
After five minutes, turn the heat off, skim any remaining foam from the surface, and gently stir in the basil leaves. Cover with a lid and set aside to cool for an hour.
While you’re waiting for the honey-water to cool, give your blueberries a good mashing with the spoon or potato masher to release the juice.
Now that the honey-water has cooled for an hour remove the basil and discard. Pour the basil-infused honey-water into the bucket of mashed blueberries. Add in the raisins and tea leaves. Using the spoon, give the mixture a good stir, and add enough of the remaining 2 cups of water to bring the entire amount up to a gallon.
Hint – you’ll lose some of the liquid when racking (siphoning the mead to another container) from one container to another, so I usually add a little more than a gallon.
Most of the time, this ensures that I won’t need to top up my mead later on in the process.
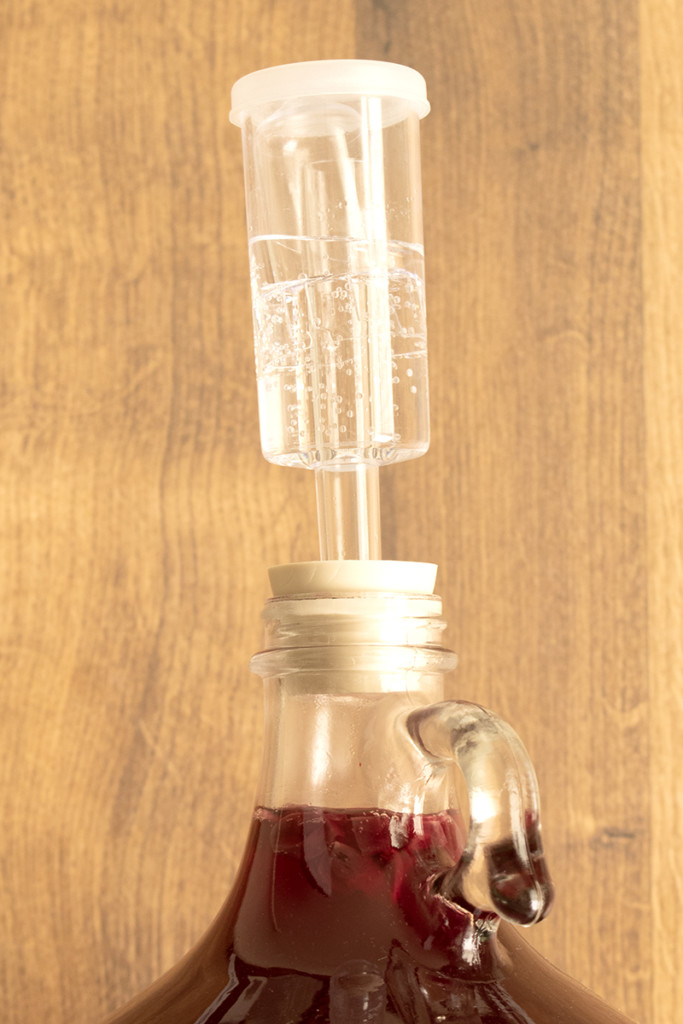
Put the lid on the bucket and fit the grommeted hole with an airlock. See the picture below showing an assembled airlock.
If you’re using a stone crock, place a clean towel over the top.
Wait for 24 hours, then sprinkle the packet of yeast over the blueberries and stir into the must (that’s what we call that mess in the bucket), cover the bucket again.
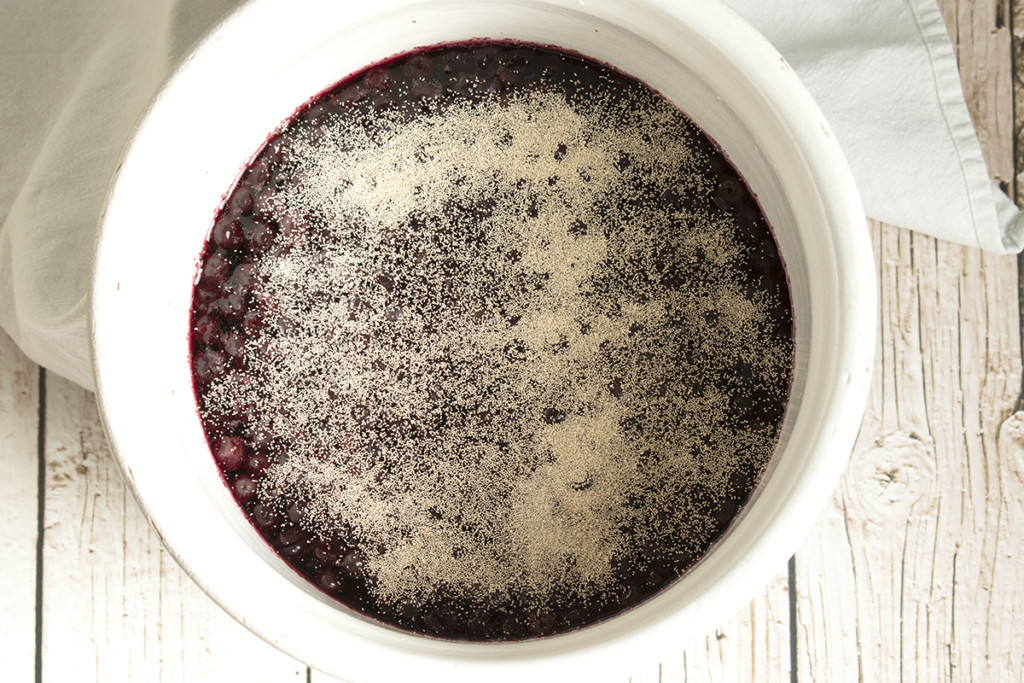
Hint – Be a Viking! When adding the yeast, yell at them to wake up. Yeast are sleepy and lazy; you need to shout at them, as the Vikings did, to wake them up. Get the kids to help; they’re good at yelling.
Place your bucket somewhere out of direct sunlight and let those happy little yeast do their thing. After a day or so, you should see bubbles rising up through the blueberry mash. Let this mixture ferment for 10-12 days.
Secondary Fermentation and Racking
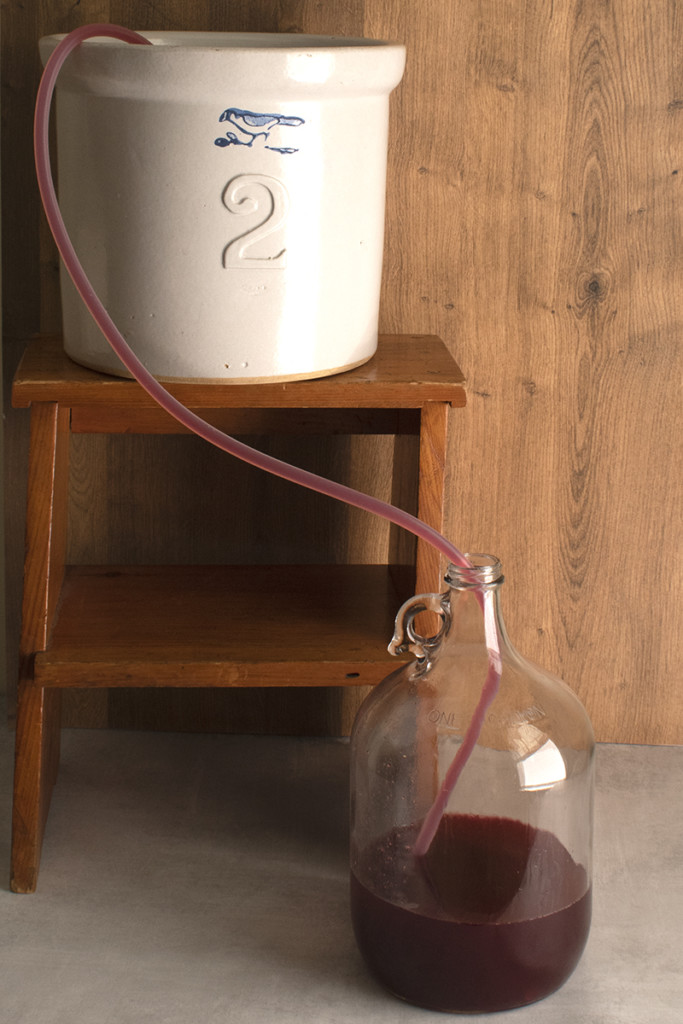
Now that the yeast has had a chance to party for a while, they’ll be ready to settle in for the long ferment. It’s time to siphon the mead off of the must and into the glass carboy, also known as a secondary fermenter.
Again, make sure all of your equipment is clean and sanitized before you start.
You’ll need to put your brew bucket somewhere up higher than the carboy. You can set the bucket on the counter and the carboy on a chair, or put the bucket on your table and the carboy on the chair. You get the idea.
Next, put the hose clamp on your tubing near one end and put the other end of the tubing into the bucket of mead. Don’t put it at the bottom. There will be a layer of sediment at the bottom of the bucket made up of dead yeast. (They partied too hard.) We want as much of that sediment to stay in the bucket as possible.
Suck-Starting a Siphon
Holding the tube in the carboy steady with one hand, start sucking on the other end of the line just enough to get the mead to flow through the hose, then clamp it shut and put the free end of the hose into your empty carboy. Unclamp the hose, and you’re off to the races.
As your carboy fills, you may transfer some of the sediment and even a blueberry or two. Don’t worry about it. Just siphon off enough to fill the carboy up to the neck. You may need to tilt your bucket as the level drops, do so slowly.
Once your glass carboy is filled to the neck with mead, or you’ve run out of liquid, go ahead and fit it with the bung and airlock.
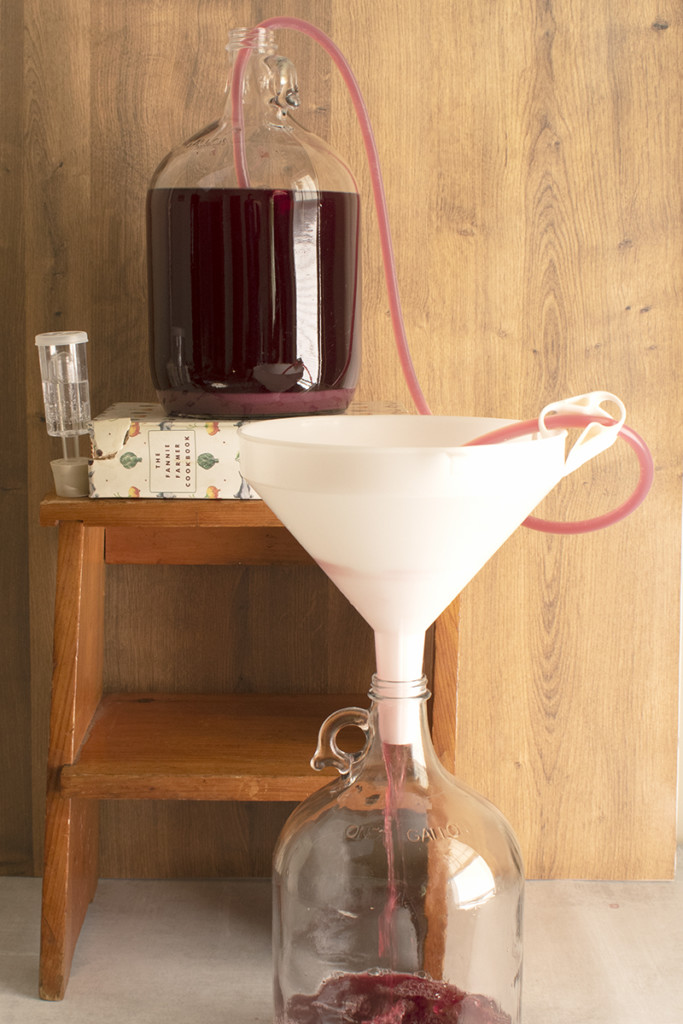
Note – You may, of course, use the funnel with the screen in the glass carboy; this will keep blueberries and seeds out. However, I often find that with this first racking, there’s too much sediment, and the funnel screen gets clogged quickly and pools.
You may have sediment and blueberries in your carboy, and you may not have had enough liquid to reach the neck – that’s okay. We’ll fix all of these things tomorrow. Leave the carboy on your counter overnight, and the sediment will settle at the bottom again.
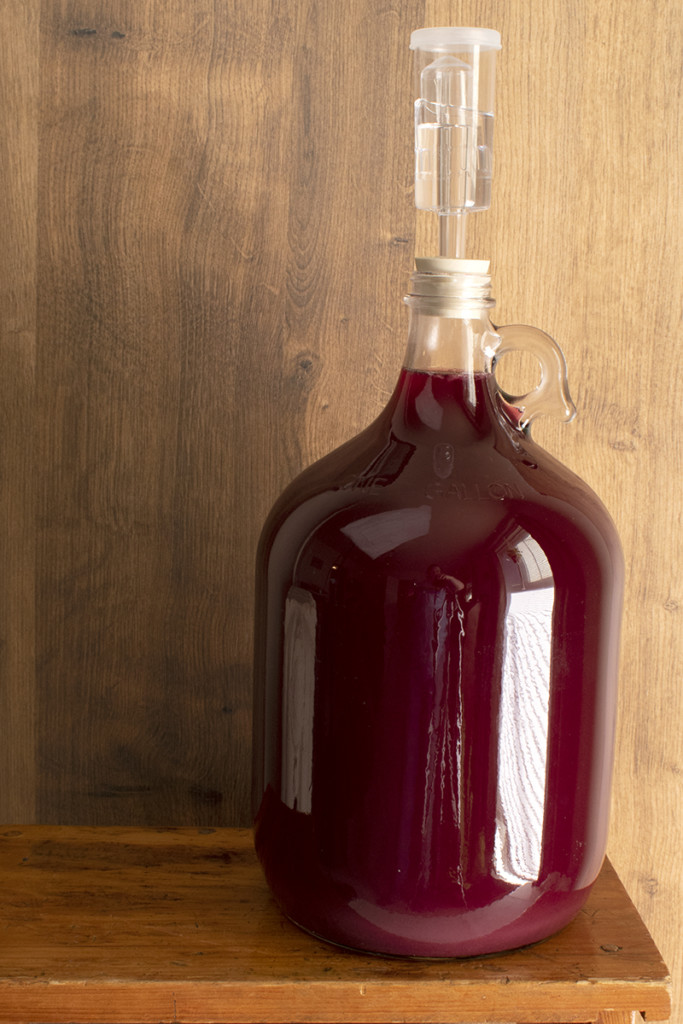
Above you can see that the mead is very cloudy from being siphoned. But below, after 24 hours, it’s cleared, and the sediment is now at the bottom of the carboy.
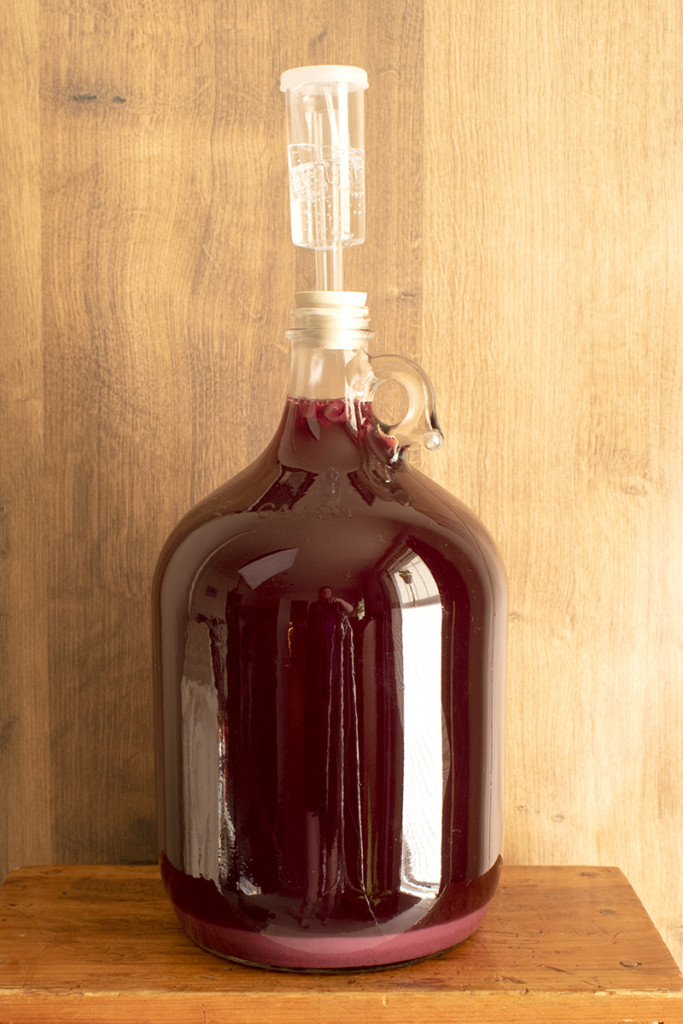
Rack the cleared blueberry basil mead back into the (cleaned) brew bucket, being careful not to dip the hose down near the sediment. You can do this easily now that you can see where the hose is in relation to the sediment.
Rinse the sediment out of the carboy and fit it with the funnel and screen and then gently pour the mead back into the carboy. Or, if you have two carboys, you can rack the mead straight from one to the other with the funnel.
See? I told you having two carboys would make your life easier.
Replace the bung and airlock when you’re finished. If you find that your mead is low, you’ll need to top it up to the neck. You want as little surface area of the mead exposed to air as possible going forward.
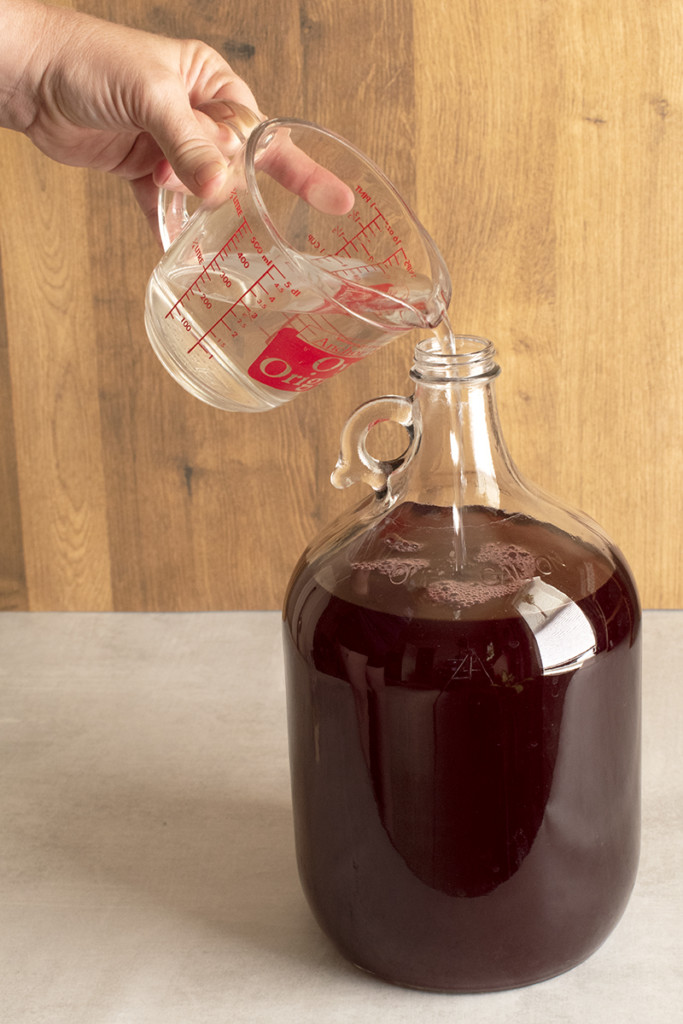
To top up the mead, use water that’s been boiled and cooled to room temperature. Replace the bung and airlock.
Label, label, label
Label your carboy. Doing so is going to save you a lot of headaches.
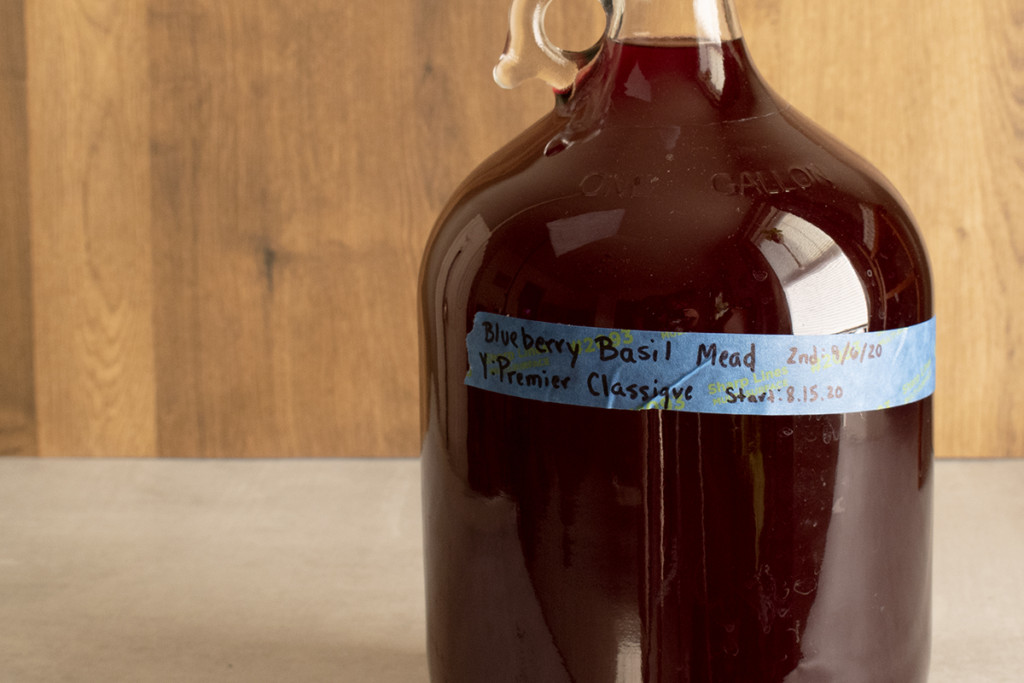
I love painters’ tape for this. It’s easy to write on, and it peels off without leaving residue. I slap a piece of tape on my carboy that’s at least 8″ long, so I have plenty of room to write notes.
And now we wait.
Waiting is the hard part, or the easy part once you forget about it.
Place your carboy someplace warm and out of direct sunlight. My pantry is my brew space. I always have several carboys of something or other lined up on the floor under the shelves bubbling away.
I suggest covering the carboy with an upside-down paper bag.
This keeps the light out, and also keeps the water in the airlock from evaporating too quickly. Check your airlock once every two weeks to be sure it has enough water in it. I set a reminder on my phone.
At first, you’ll probably see lots of bubbles rising to the surface at the neck of your carboy while the yeast turns all of that sugar into alcohol. After a while, it will slow, and you’ll rarely see bubbles. When you check your airlock, if you start to notice a layer of sediment (also called lees) more than a centimeter deep on the bottom, rack the mead again, leaving the sediment behind.
Don’t forget to siphon a tiny bit into a glass to taste.
You’ll be amazed at how much the flavor has changed since you started it.
After about six months, fermentation should be complete. Give the carboy a good rap with your knuckle and watch for bubbles rising at the neck. I also shine a flashlight through the side of the carboy to look for bubbles. As long as none are present, you should be good to bottle the mead. If it’s still actively fermenting, let it go for another month.
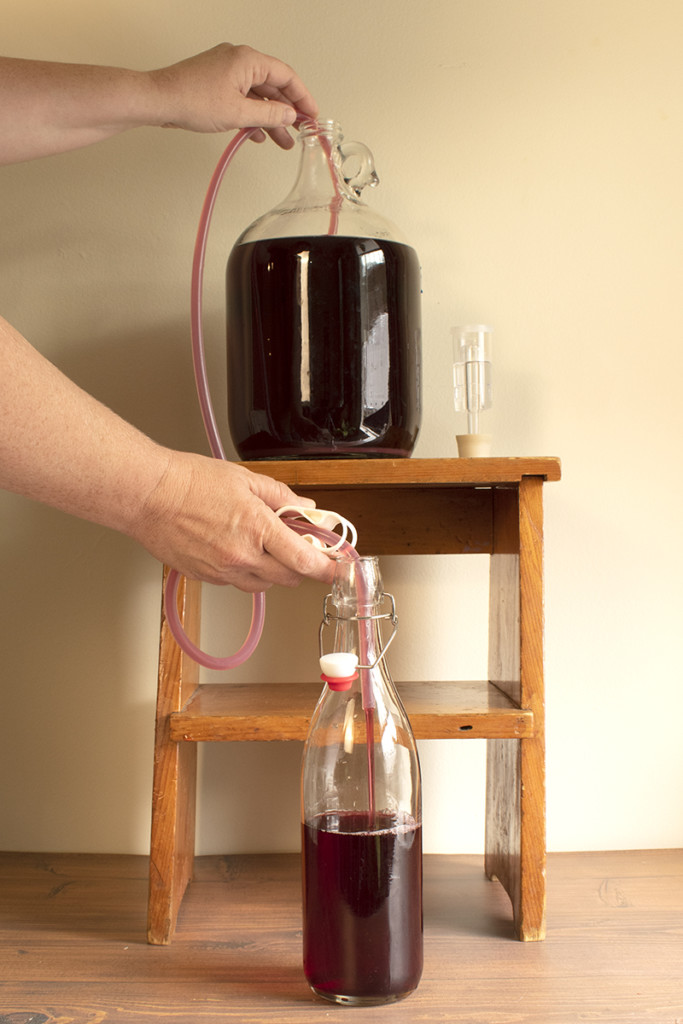
Using the hose and clamp the same way you did to rack the mead, siphon the finished mead into clean and sterilized bottles. Leave about 1″-2″ of headspace at the top of the bottles. If you’re corking your bottles, you’ll need to leave enough space for the cork plus an inch.
Once bottled, you can drink your blueberry basil mead right away.
But you’ve waited this long, why not bottle-age it for the full year. Trust me; it’s worth the wait. The flavors mellow and mingle in the bottle, and turn into something genuinely wonderful that’s worth sharing with friends and family.
Or hoard it all to yourself. You’ll get no judgment from me if you do.
Slainte!
Is hard cider more your thing? Here’s a no-fuss recipe for hard cider you can brew at home.

Get the famous Rural Sprout newsletter delivered to your inbox.
Join the 50,000+ gardeners who get timely gardening tutorials, tips and tasks delivered direct to their inbox.